Getting Started
Server Requirements
To run SetSail - Laravel SaaS Starter Kit properly, make sure your server meets the following minimum requirements:
- PHP >= 8.2.0
- MySQL 5.7+ or MariaDB 10.3+
- BCMath PHP Extension
- Ctype PHP Extension
- Fileinfo PHP Extension
- JSON PHP Extension
- Mbstring PHP Extension
- OpenSSL PHP Extension
- PDO PHP Extension
- Tokenizer PHP Extension
- XML PHP Extension
- Curl PHP Extension
- Imagick PHP Extension
- Zip PHP Extension
Browsers
This application is compatible with all modern browsers. Please ensure JavaScript is enabled for optimal performance.
Build Tools
- Laravel
- Filament
- Tailwind CSS
- Alpine.js
- Livewire
- Heroicons
- Phosphor Icons
- Vite
- Spatie Laravel Permission
Installation
To install SetSail, you need a local PHP development environment with PHP ≥ 8.2 and MySQL. You may use Laravel Valet, Laragon, XAMPP, MAMP, or any environment you're comfortable with.
Installation Steps
- Unzip the Downloaded File
Extract the contents of the ZIP file you downloaded from CodeCanyon. - Move to Your Development Directory
Rename the extracted folder if you want, then move it to your preferred development path (e.g.,~/Sites). - Copy the
.envFile
In the terminal, navigate to the project folder and run:cp .env.example .env - Install PHP Dependencies
Run the following command to install Composer dependencies:composer install - Generate Application Key
php artisan key:generate - Configure the Database
Update the.envfile with your database credentials:DB_CONNECTION=mysql DB_HOST=127.0.0.1 DB_PORT=3306 DB_DATABASE=your_database DB_USERNAME=your_username DB_PASSWORD=your_password - Run Migrations and Seeders
php artisan migrate --seed - Install Frontend Dependencies
npm install - Build Frontend Assets
npm run build - Start Your Local Server
Visitphp artisan servehttp://localhost:8000in your browser.
Login Credentials
After installation, use the following default credentials to log in:
- Email: admin@example.com
- Password: password
You can change these credentials in the user settings after logging in.
You're Ready!
SetSail is now installed and ready to use. Extend it however you like and start building your SaaS application!
Local Development
SetSail uses Laravel Vite for compiling frontend assets and enabling fast hot-reloading in development. Follow the steps below to set up your local environment.
Install Node Dependencies
From the root of your project, run the following command:
npm installThis will install all frontend dependencies including Tailwind CSS, Alpine.js, and Vite.
Start Asset Watcher
To enable live-reload and development compilation, run:
npm run devThis will start the asset watcher. Whenever you update frontend code (Blade templates, Tailwind classes, JavaScript, etc.), Vite will automatically refresh the page or inject changes.
Build Assets for Production
When you're ready to deploy your app, compile and minify your assets by running:
npm run buildThis step ensures that all assets are optimized for speed and performance in a production environment.
Optimize Laravel for Production
To further enhance performance, you can optimize the Laravel application by running:
php artisan optimizeThis will cache routes, configuration, and views for improved performance.
Optimize Filament
If your project uses Filament Admin Panel, you can cache its components and icons for faster rendering by running:
php artisan filament:optimizeYou're now ready to build and extend your SaaS app with full development tools in place.
Customizations
SetSail is designed to be fully customizable. Below are a few common areas you might want to personalize right away, including your logo, favicon, primary color, and authentication views.
Change Your Logo
Update the default logo by editing the following Blade components:
resources/views/components/logo.blade.php– Full logo (icon + name)resources/views/components/logo-icon.blade.php– Icon-only version
Each file contains an SVG tag like this:
<svg {{ $attributes->merge(['class' => 'text-gray-900 dark:text-white']) }} ... ></svg>You can replace the SVG with your own SVG markup, or use an <img> tag:
<img src="/images/your-logo.png" {{ $attributes->merge(['class' => 'h-8']) }} />This approach preserves passed attributes like class names when using the component:
<x-logo class="h-8" />Change Your Favicon
Replace the default favicon files to reflect your brand:
public/setsail/favicon.png– Light mode faviconpublic/setsail/favicon-dark.png– Dark mode faviconpublic/favicon.ico– Optional for older browsers
You can also customize the favicon component located at:
resources/views/components/favicon.blade.phpChange the Default Color
Update the primary color used throughout the UI by modifying:
config/setsail.php'primary_color' => '#1DA1F2',Authentication Views
SetSail uses DevDojo Auth for authentication. To customize the design of login, register, and reset-password views, visit:
/auth/setup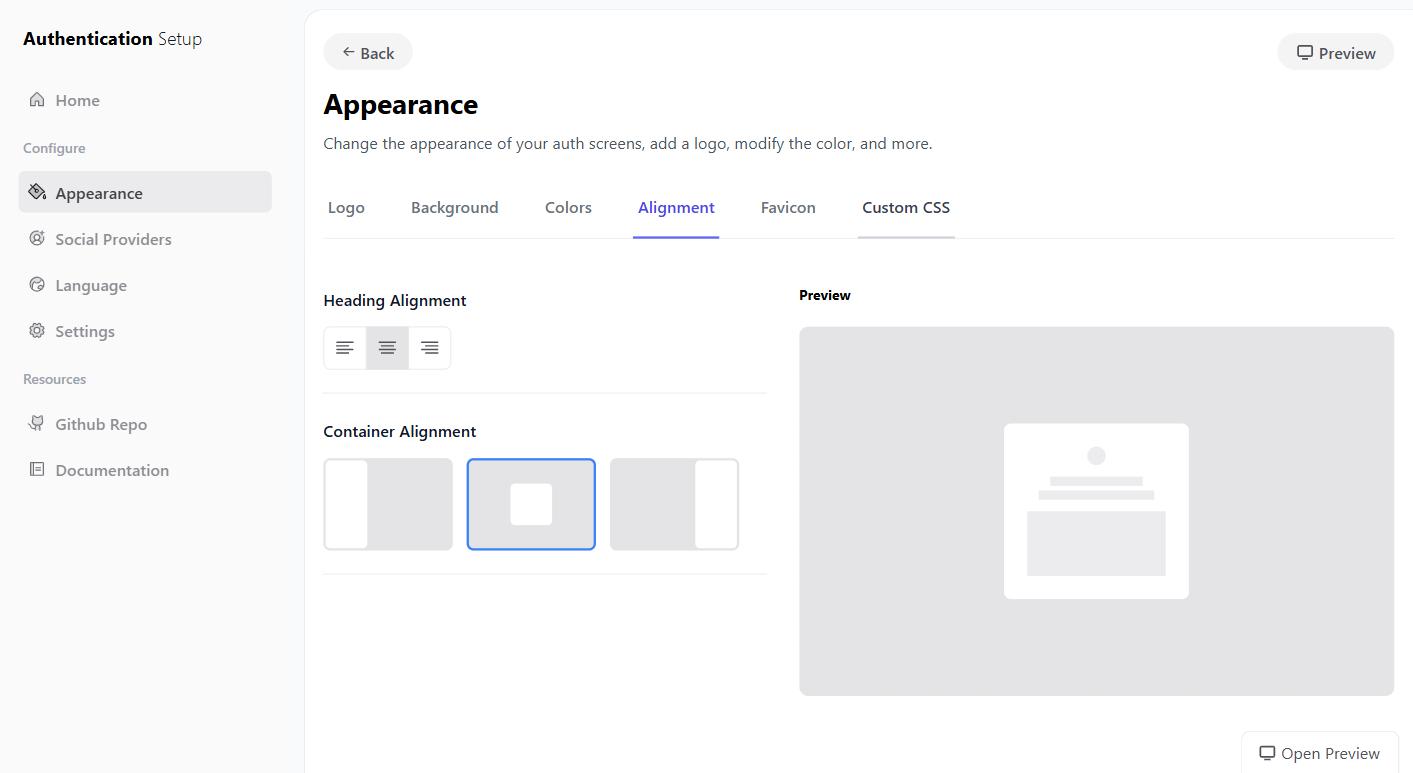
From this interface, you can customize layout, logo, color scheme, background, and alignment of the authentication forms.
Features
Authentication
SetSail is built on top of DevDojo Auth, providing all the essential authentication features required for most SaaS applications. You can easily customize login pages, enable 2FA, and configure social logins without extra setup.
Auth Customizations
SetSail comes with a powerful setup interface available at /auth/setup. From here, you can:
- Upload your logo
- Change your color scheme
- Toggle social login providers
- Enable email verification and more
Available Authentication Pages
Out of the box, SetSail includes the following authentication-related pages:
- Login
- Register
- Verify Email
- Password Confirmation
- Password Reset Request
- Password Reset
- Two-Factor Challenge
Login
Users can log in by visiting the /auth/login route. Upon successful login, they are redirected to the dashboard. A default admin account is included upon installation:
email: admin@example.com
password: password
Registration
By default, user registration is open to everyone. If you'd like to restrict access to subscribed users, you can apply the subscribed middleware to routes instead of auth.
This middleware checks if the user is logged in and has an active subscription. You can also use this to offer a free tier with limited features and encourage upgrades.
To customize registration behavior, update the App\Models\User model. SetSail comes preconfigured to auto-generate usernames and assign a default role:
protected static function boot()
{
    parent::boot();
    static::creating(function ($user) {
        if (empty($user->username)) {
            $username = Str::slug($user->name, '');
            $i = 1;
            while (self::where('username', $username)->exists()) {
                $username = Str::slug($user->name, '') . $i;
                $i++;
            }
            $user->username = $username;
        }
    });
    static::created(function ($user) {
        $user->syncRoles([]);
        $user->assignRole(config('setsail.default_user_role', 'registered'));
    });
}
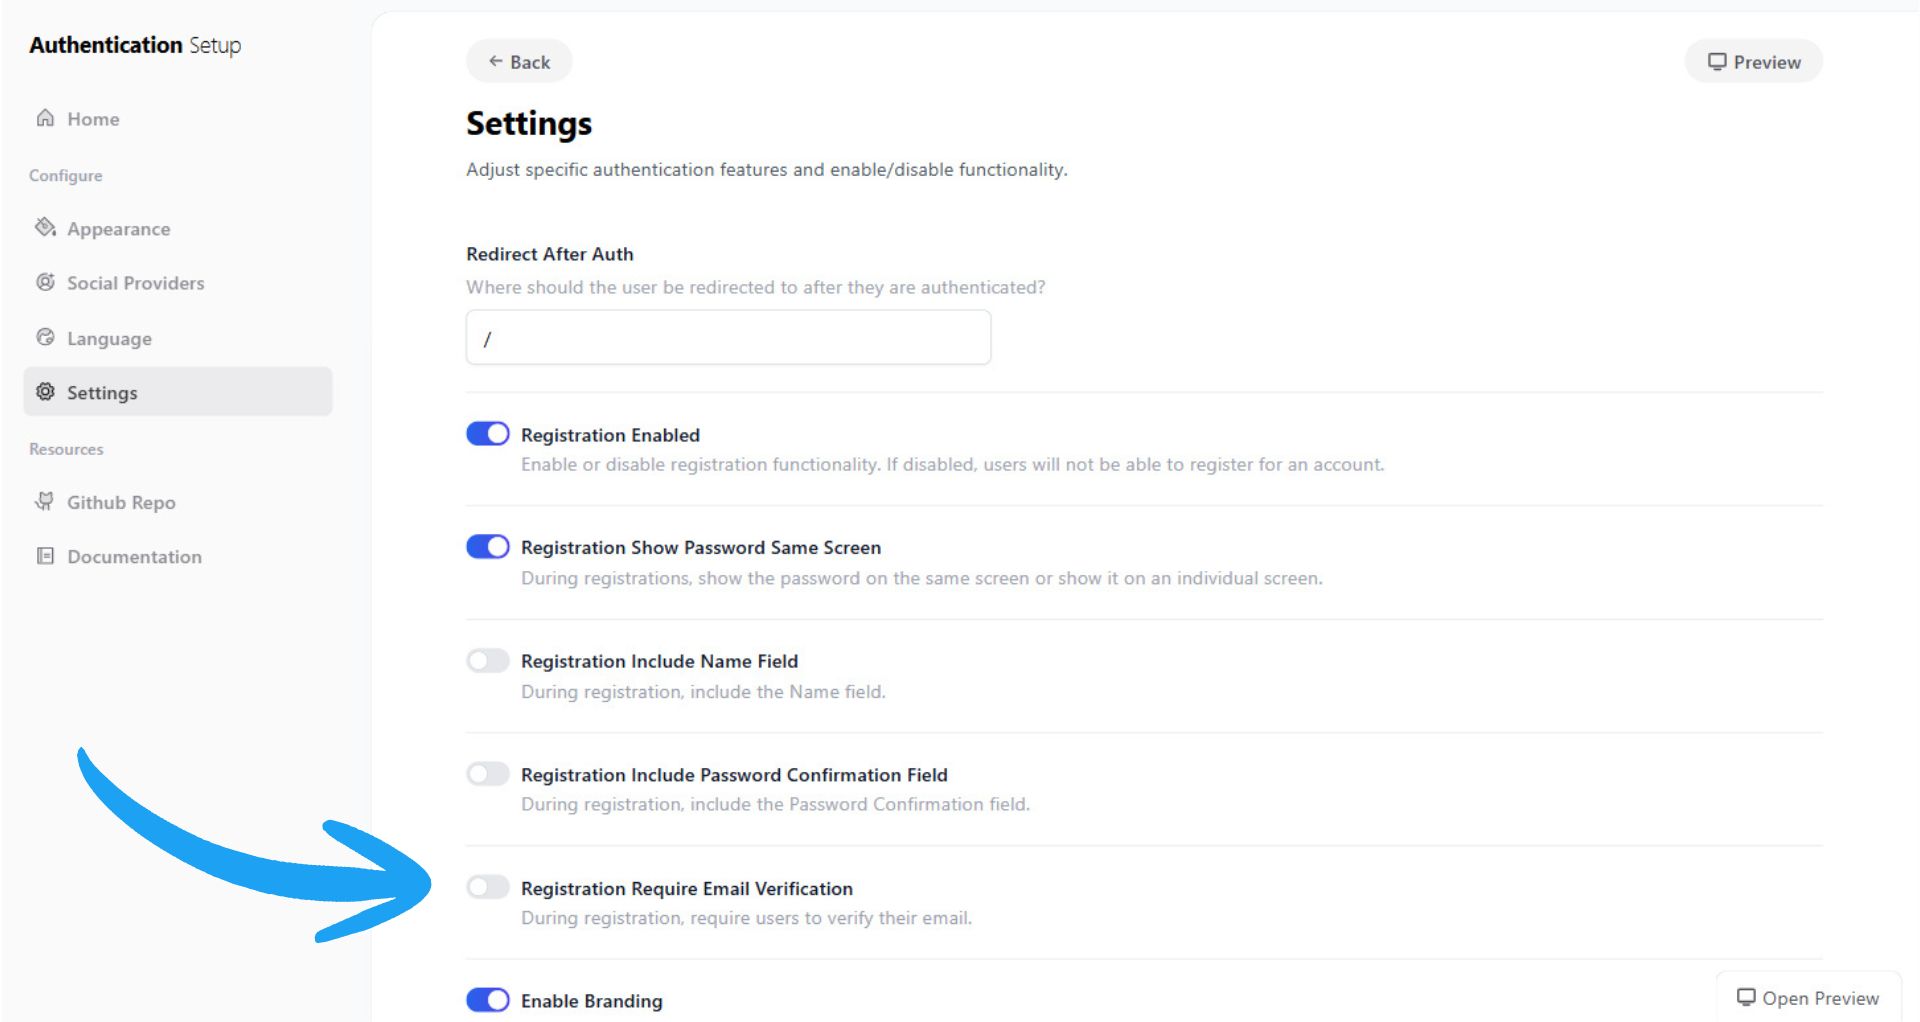
Verify Email
Email verification can be required by toggling the Require Email Verification option at /auth/setup/settings. Once enabled, new users must verify their email before gaining access.
Password Confirmation
Protect sensitive routes by applying the confirm middleware. This will prompt the user to re-enter their password to proceed.
Password Reset / Request
Users can reset their passwords via the /auth/password/reset route. They will receive a unique reset link via email and can update their password securely.
Two-Factor Authentication (2FA)
SetSail allows users to enable Two-Factor Authentication for improved account security. This can be toggled from the user settings interface.
Learn how to configure 2FA in the DevDojo Auth documentation.
Social Authentication
Enable social logins (Google, GitHub, etc.) easily by navigating to /auth/setup/providers. There, you can toggle providers and input the necessary API credentials.
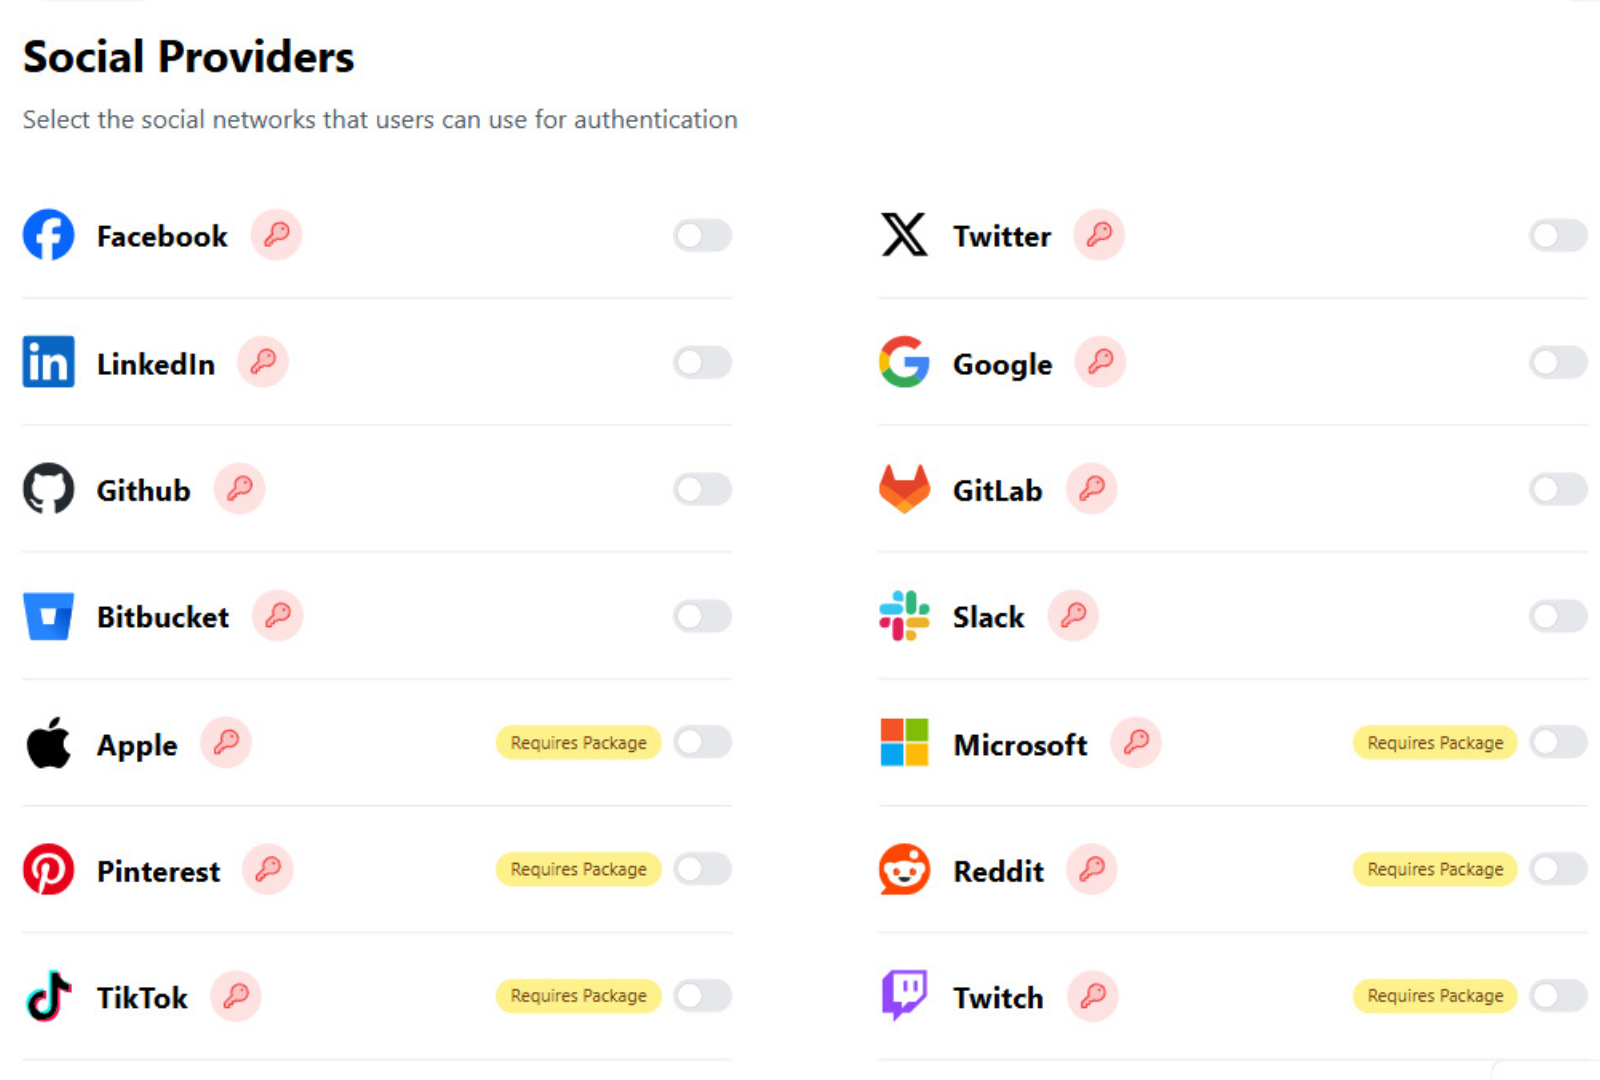
Once enabled, users will be able to register and log in via the selected social platforms.
User Profiles
SetSail allows you to manage customizable user profiles with ease. Users can personalize their account information and you can collect additional fields using Custom Profile Fields.
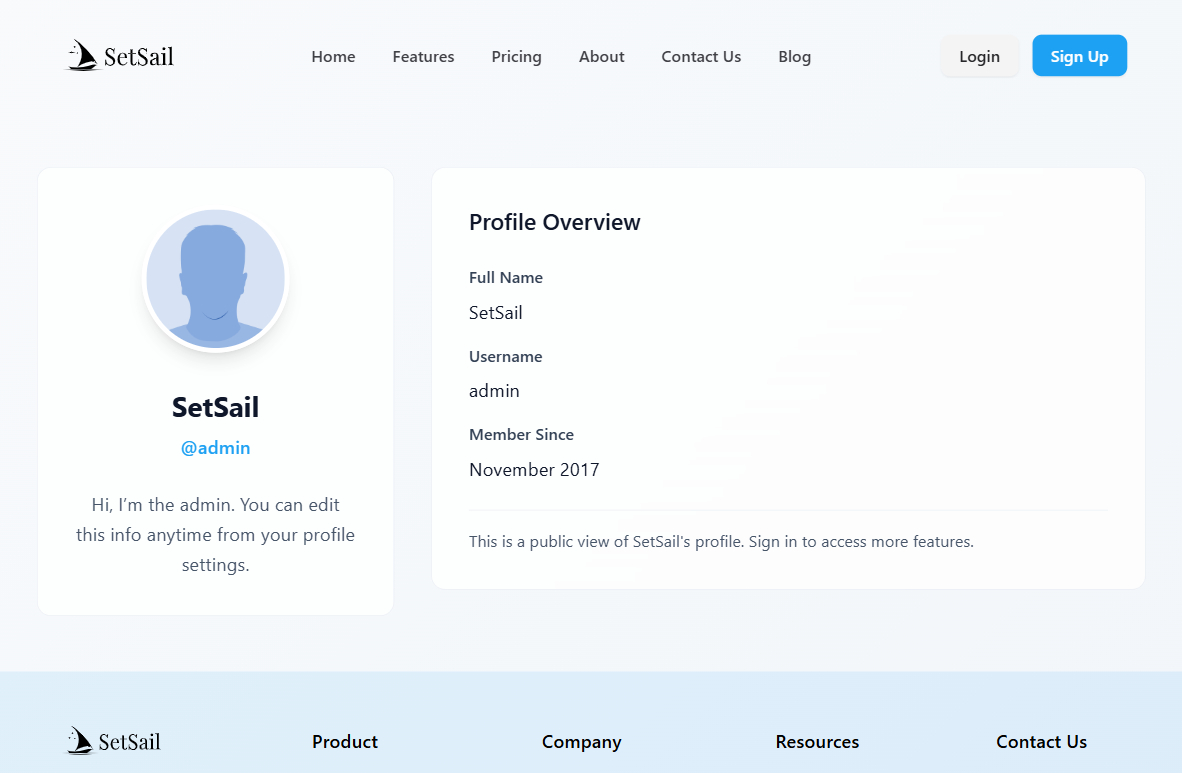
Public Profile Page
Every user has a public profile page available at: /profile/{username}
- Authenticated users see the profile using the
app.blade.phplayout. - Guest users see the profile using the
marketing.blade.phplayout.
To disable public profile pages, add this route in routes/web.php:
Route::redirect('profile/{username}', '/');Then run php artisan route:clear to clear cached routes.
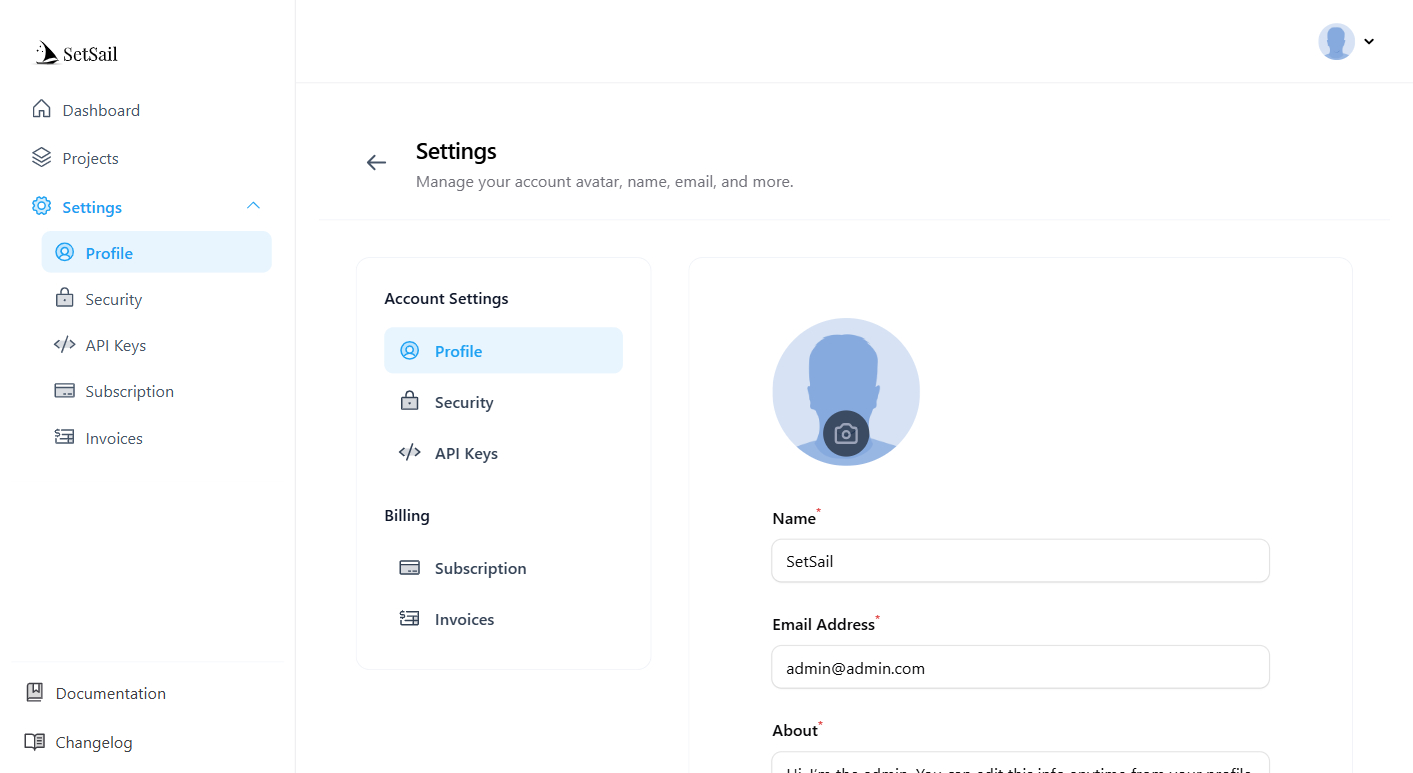
Profile Settings
Users can manage their profile by clicking on Settings in the user dropdown menu.
By default, users can update:
- Avatar
- Name
- Additional custom profile fields (e.g., About)
Custom Profile Fields
You can add extra fields to user profiles using the configuration file: config/profiles.php.
Default structure example:
<?php
return [
    'fields' => [
        'about' => [
        'label' => 'About',
        'type' => 'Textarea',
        'rules' => 'required',
        ],
    ],
];
To add another field, like “Occupation”:
'occupation' => [
    'label' => 'What do you do for a living?',
    'type' => 'TextInput',
    'rules' => ''
]
The field data is automatically stored in the profilekeyvalue table.
Get Profile Field Data
To retrieve any profile field value for the authenticated user:
auth()->user()->profile('occupation');Profile Field Types
SetSail uses Filament Form Builder, so you can use any of the following field types:
- TextInput
- Textarea
- Checkbox, Toggle, Radio
- Select, CheckboxList, ToggleButtons
- DateTimePicker, ColorPicker
- FileUpload
- RichEditor, MarkdownEditor
- TagsInput
You can also use third-party Filament field components by specifying their full class path:
'type' => \FilamentTiptapEditor\TiptapEditor::classBilling
SetSail integrates seamlessly with Stripe or Paddle to help you accept subscription payments with ease. Below you'll learn how to configure billing for your SaaS platform.
Selecting Your Payment Provider
Choose your preferred billing provider by setting the BILLING_PROVIDER in your .env file:
BILLING_PROVIDER=stripeThis setting is used inside config/setsail.php:
'billing_provider' => env('BILLING_PROVIDER', 'stripe'),Stripe Integration
Stripe API Credentials
Login to your Stripe dashboard and retrieve:
- Publishable Key
- Secret Key
.env
STRIPE_PUBLISHABLE_KEY=pk_test_...
STRIPE_SECRET_KEY=sk_test_...
Stripe Webhook Secret
To enable webhook events:
- Go to
Developers > Webhooks - Create new endpoint:
https://yourdomain.com/webhook/stripe - Select all Checkout and Billing Portal events
- Copy the Signing Secret
STRIPE_WEBHOOK_SECRET=whsec_...Webhook Warning
If the webhook is misconfigured, users may reach the success page but their account won't upgrade. Make sure it's working correctly for the payment to reflect in your app.
Stripe Testing
Use Test Mode from the Stripe dashboard to test subscriptions. To test webhook locally, install Stripe CLI and run:
stripe listen --forward-to http://yourdomain.test/webhook/stripeStripe Customer Portal
Stripe provides a customer portal where users can manage their plans and payment methods. Configure it under:
Settings > Billing > Customer Portal
Paddle Integration
Paddle Environment
.env
            PADDLE_ENV=sandbox
Switch to production when deploying live.
Paddle API Credentials
From your Paddle Dashboard under Developer Tools > Authentication, get:
- Vendor ID
- API Key
- Client-side Token
.env
PADDLE_VENDOR_ID=9999
PADDLE_API_KEY=...
PADDLE_CLIENT_SIDE_TOKEN=...
Paddle Webhooks
Go to Developer Tools > Notifications and add:
https://yourdomain.com/webhook/paddleEnable these events:
- subscription.created
- subscription.updated
- subscription.cancelled
- transaction.payment_failed
Paddle Payment Link
Set your default redirect link after cancelation or updates:
https://yourdomain.com/settings/subscriptionTest Billing Process
Use these test credentials to simulate a successful payment:
- Credit Card: 4242 4242 4242 4242
- Expiry: Any future date
- CVC: Any 3-digit number
For more details:
Note: Before testing billing, make sure you’ve created at least one subscription plan. The next section will walk you through creating plans.
Subscription Plans
Subscription plans are essential for SaaS platforms, allowing you to offer customers different levels of service with unique features, pricing, and access. In SetSail, each subscription plan is linked to a User Role, enabling automatic permission control when users subscribe.
Current Plans
Upon installation, SetSail comes with three default plans:
- Basic
- Premium
- Pro
Feel free to modify or remove these plans to suit your application's needs.
Deleting Plans
To delete a plan, navigate to /admin/plans and click Delete on the plan you'd like to remove.
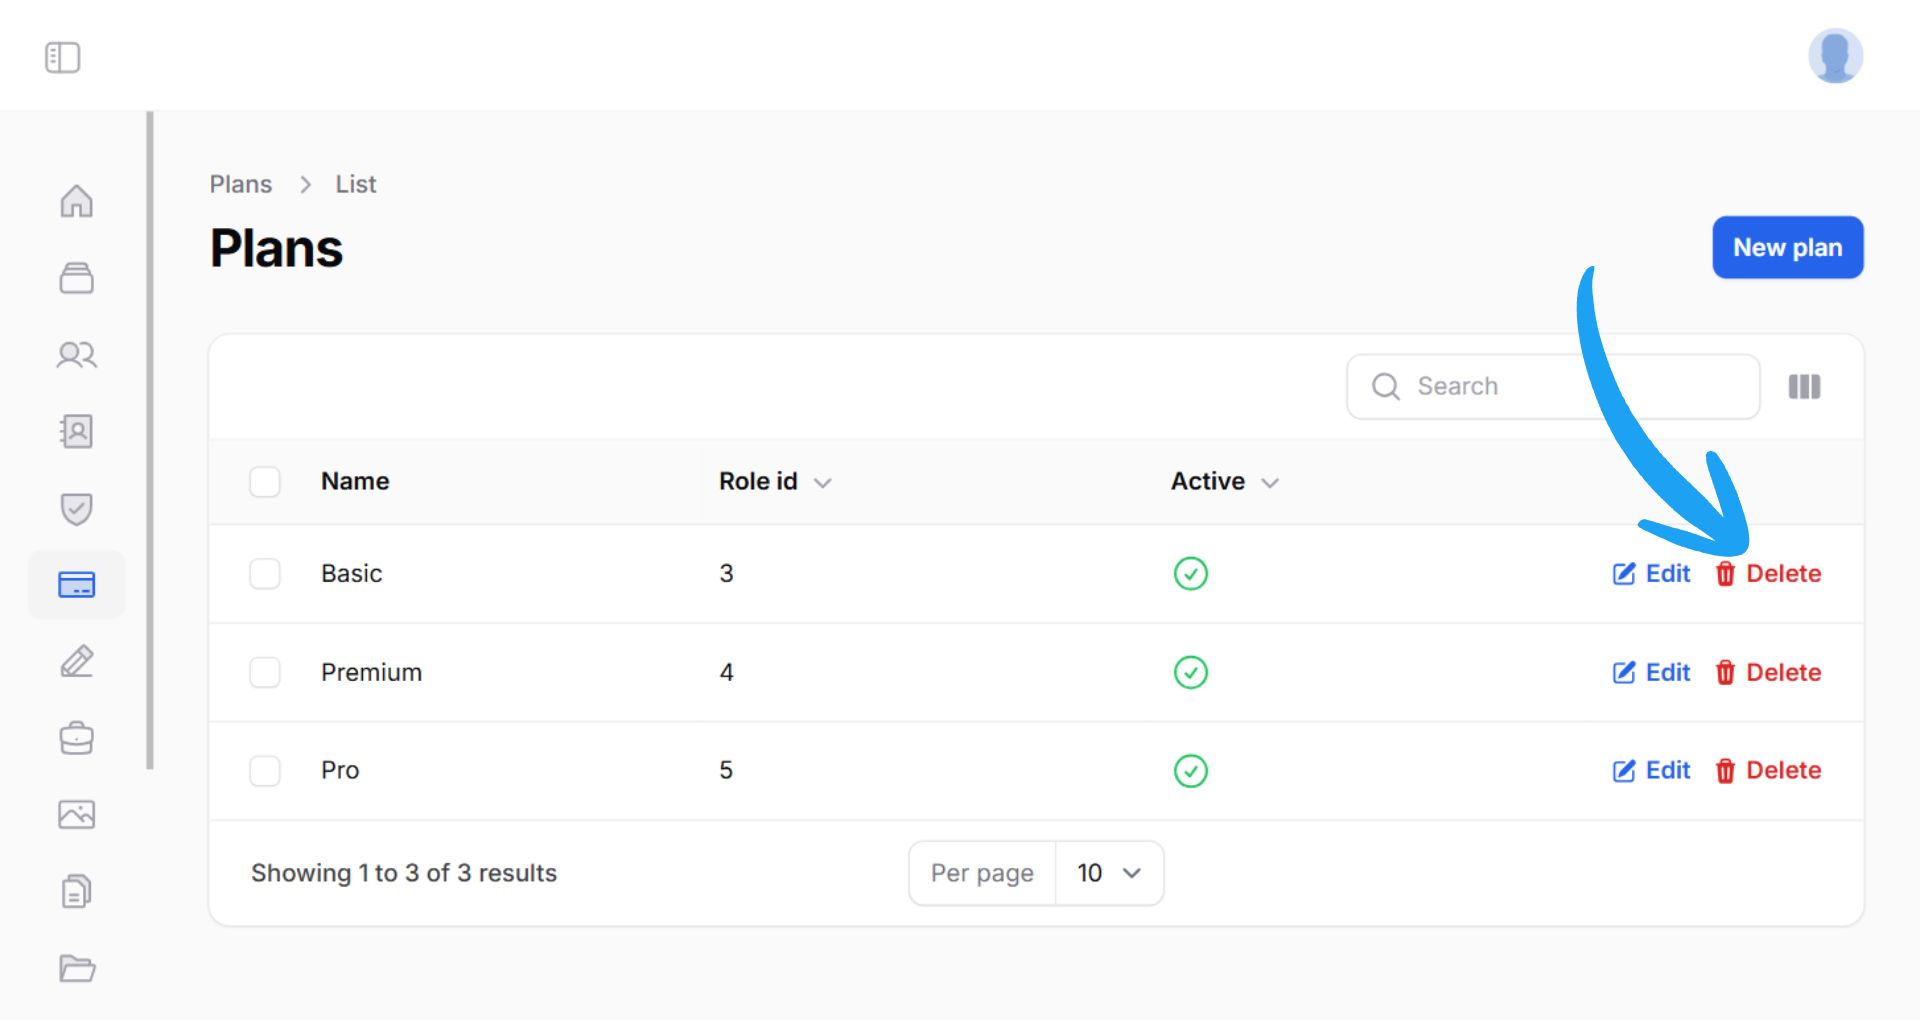
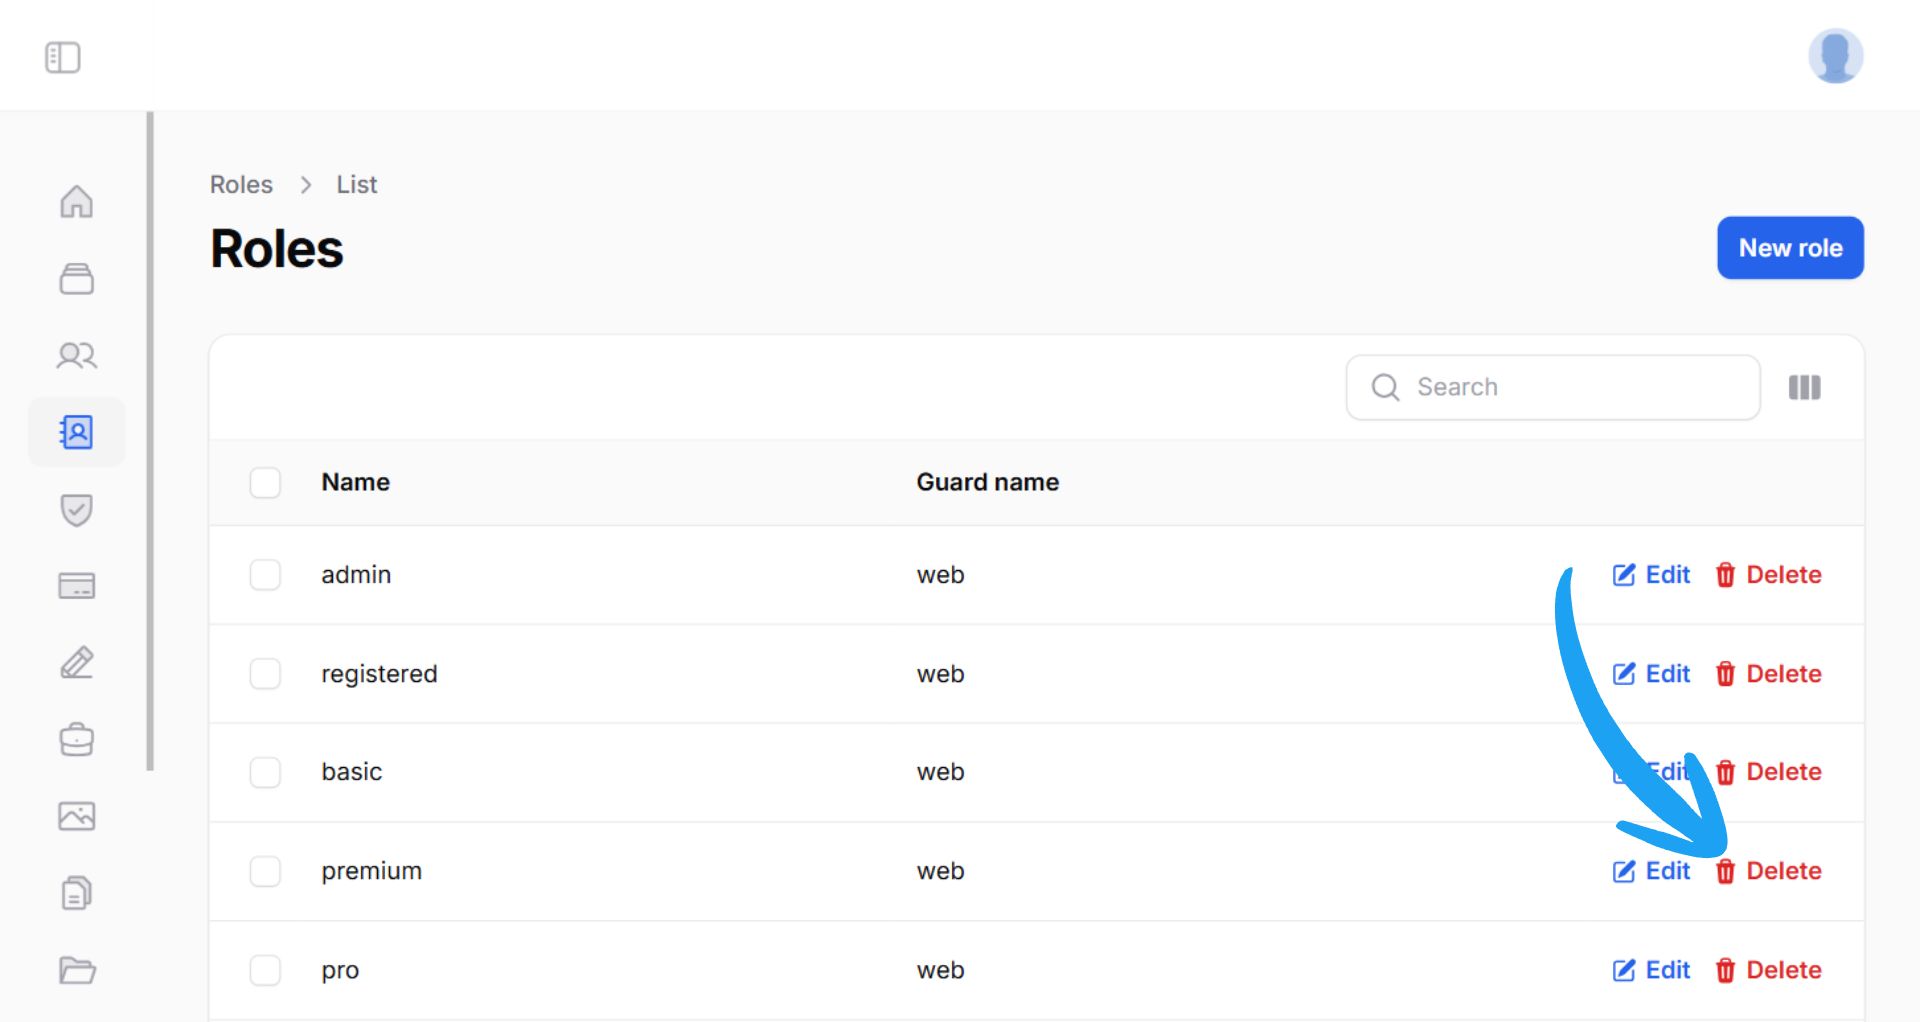
If the plan is associated with a role, you may also want to delete that role from /admin/roles:
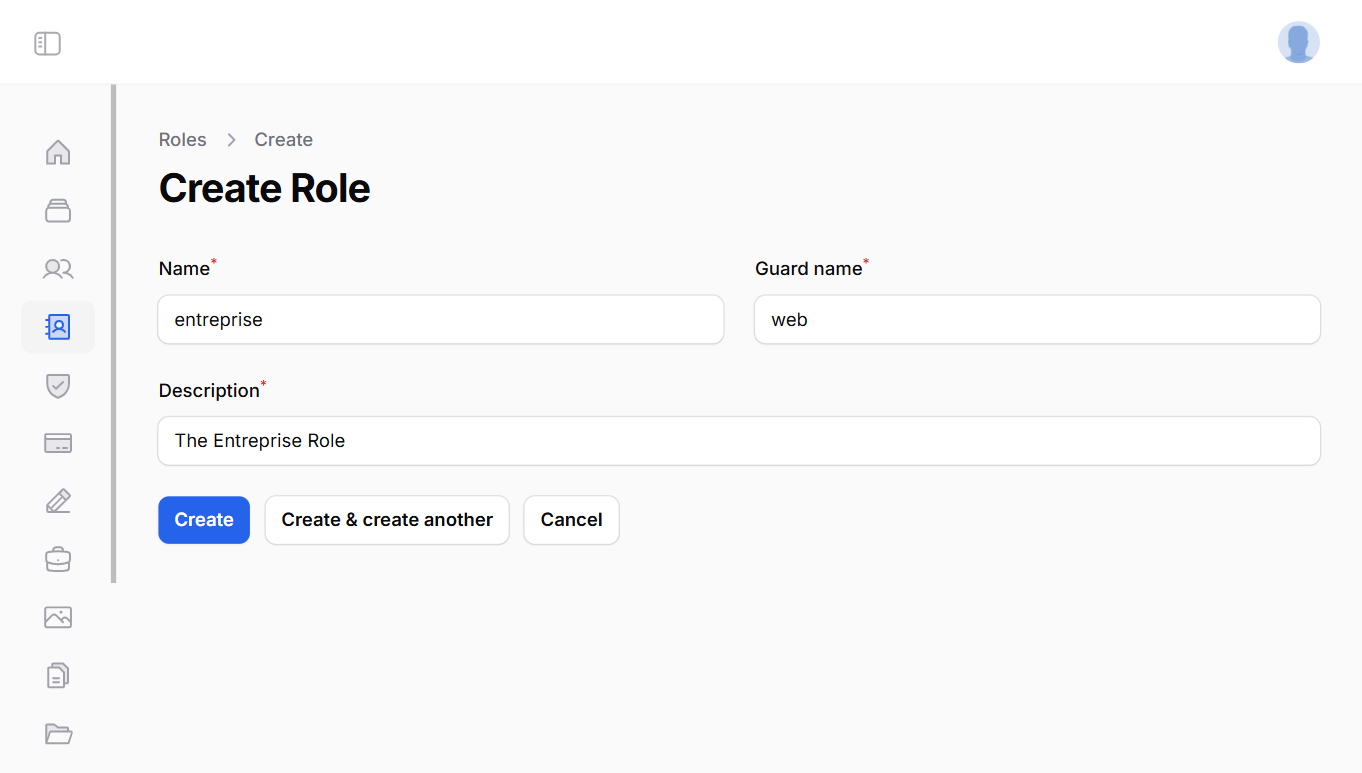
Creating a Plan
To create a new subscription plan (e.g. Starter), you’ll first want to create a role with the same name:
- Go to
/admin/rolesand click New Role. - Name it starter, use the guard
web, and add a description.
Then go to /admin/plans and click New Plan.
- Give your plan a name (e.g. starter)
- Set the pricing (monthly, yearly, lifetime)
- Leave the Price ID blank for now
- Associate it with the role starter
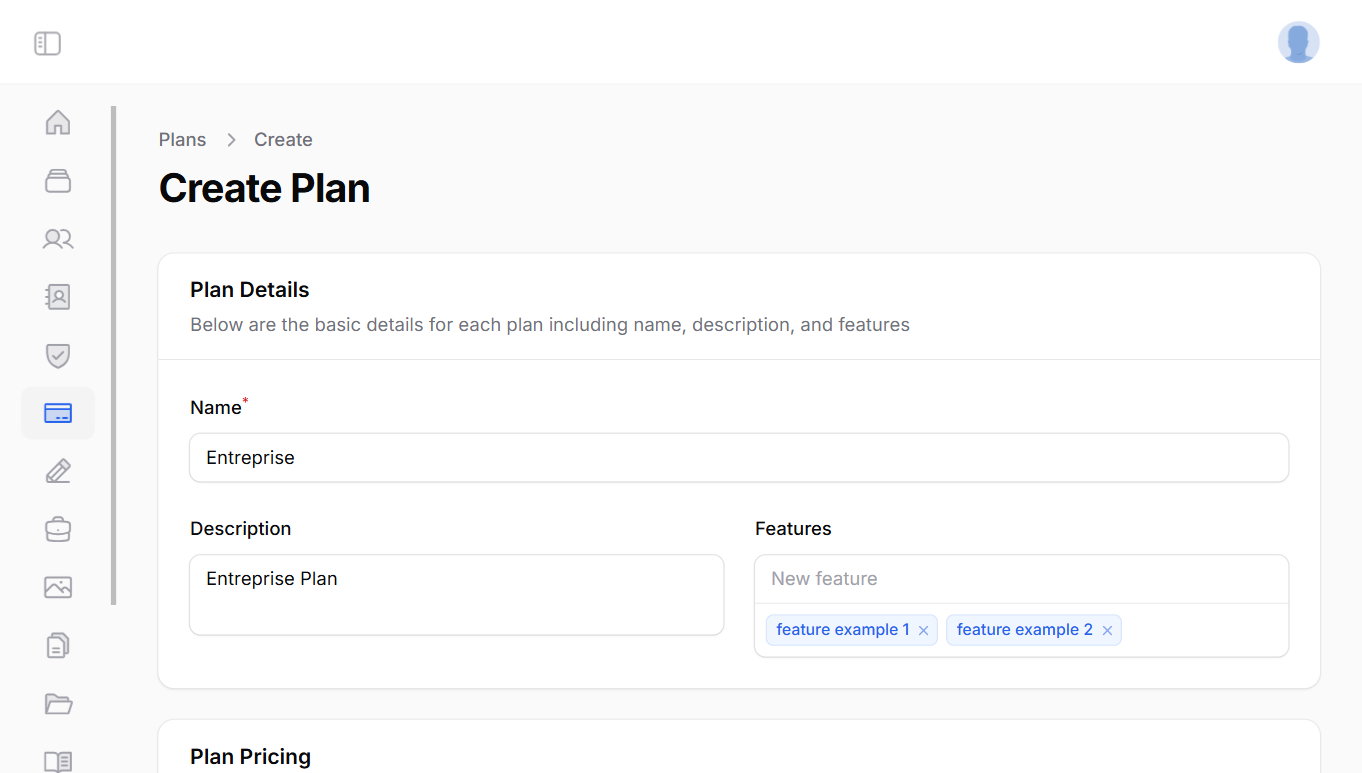
That's it! You've created a new subscription plan with role-based access control.
Getting Your Price ID from Stripe
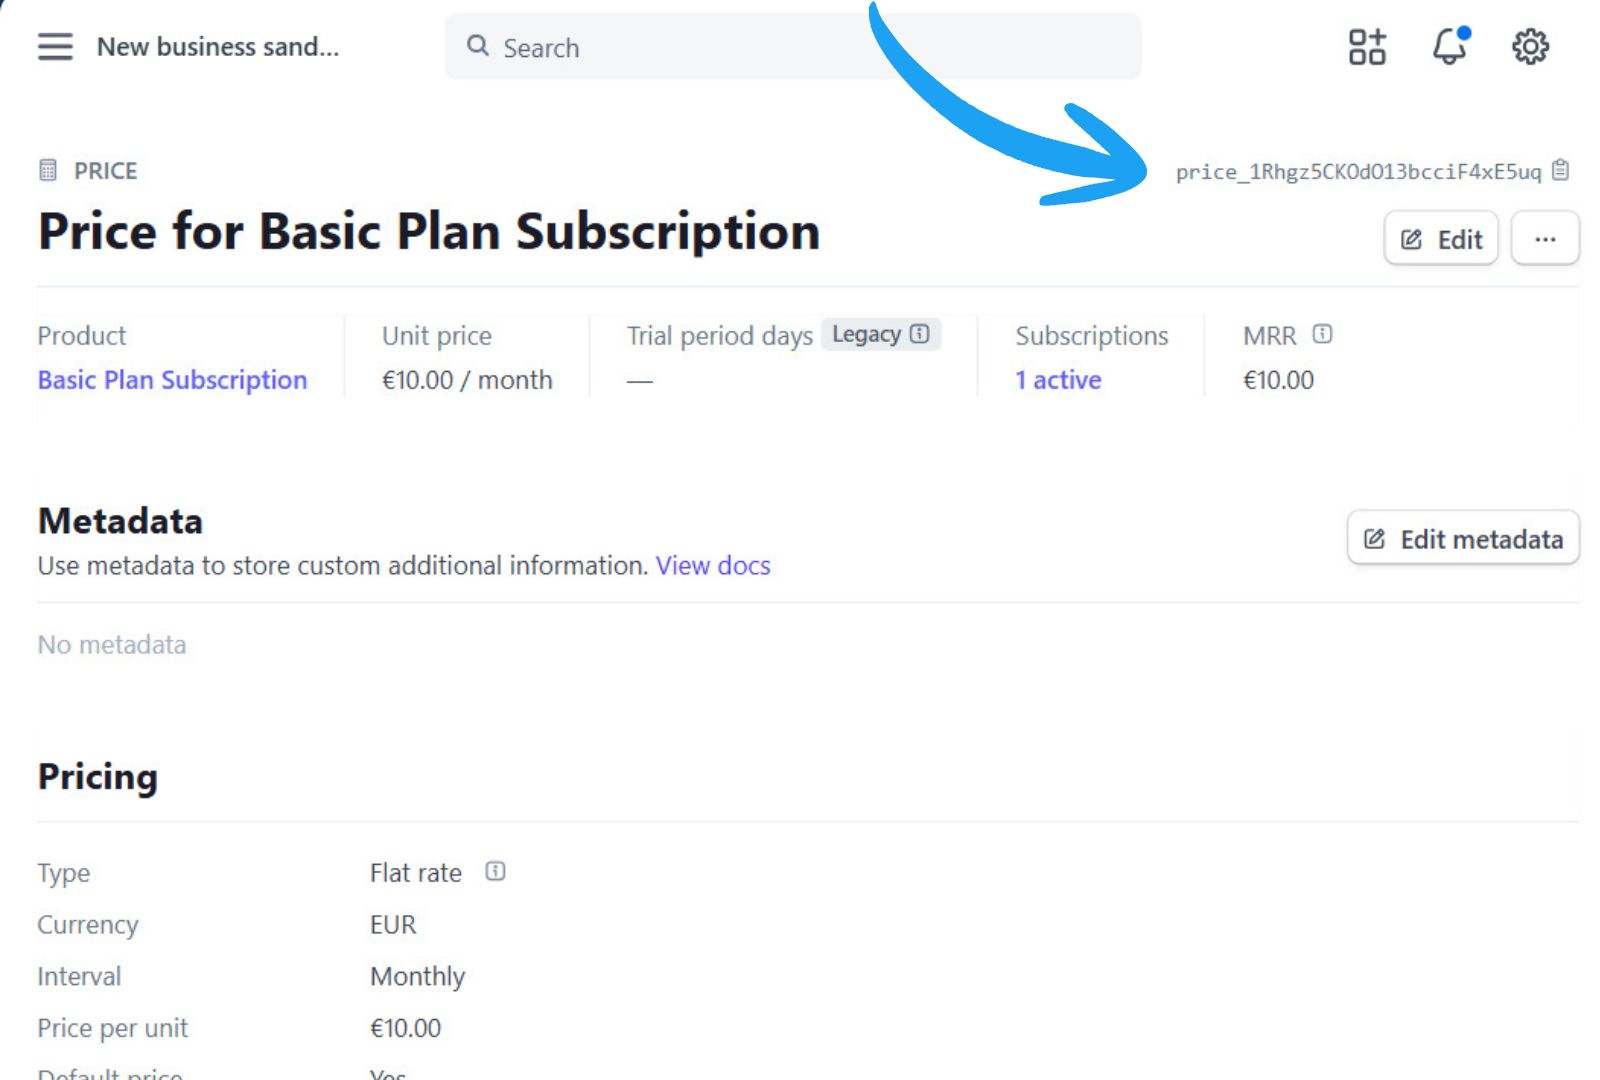
In your Stripe dashboard, go to Product Catalog and create a product. Then:
- Create a pricing option (Monthly, Yearly, etc.)
- Click the price to view the Price ID
- Copy this ID into your SetSail Plan in the admin panel
Organizing Tip:
- Create a single product with multiple prices inside (monthly, yearly, etc.)
- Or create separate products for each plan—both approaches work
Getting Your Price ID from Paddle
In your Paddle dashboard, navigate to your product catalog and:
- Create a product for each plan
- Add a price to each product
- Copy the pre_... Price ID
- Paste this ID into the Price ID field in your plan inside the admin dashboard
Roles and Permissions
Roles and Permissions allow you to manage who can access different parts of your web application.
Roles
Roles are labels given to users to define their level of access. By default, SetSail includes the following roles:
- Admin – Developer/administrator with full access.
- Registered – Default role for newly registered users.
- Basic – Linked to the Basic subscription plan.
- Premium – Linked to the Premium subscription plan.
- Pro – Linked to the Pro subscription plan.
Note: Do not modify the admin role, as it is referenced throughout the codebase.
If you rename the registered role, update the default_user_role value in config/setsail.php.
Creating Roles (via code)
use Spatie\Permission\Models\Role;

            $role = Role::create(['name' => 'writer']);
Assigning Roles to Users
auth()->user()->syncRoles([]);
            auth()->user()->assignRole('writer');
Getting Users by Role
$users = User::role('writer')->get();Checking if a User Has a Role
auth()->user()->hasRole('writer');In Blade:
@role('writer')
    I am a writer!
@else
    I am not a writer...
@endrole
Permissions
Permissions allow for more granular control. They can be assigned directly to users or to roles.
Creating Permissions
use Spatie\Permission\Models\Permission;
$permission = Permission::create(['name' => 'edit articles']);
Assigning Permissions
To a role:
use Spatie\Permission\Models\Role;
$role = Role::where('name', 'writer')->first();
$role->givePermissionTo('edit articles');
To a user:
auth()->user()->givePermissionTo('edit articles');
Revoking Permissions
use Spatie\Permission\Models\Permission;
$permission = Permission::where('name', 'edit articles')->first();
$role->revokePermissionTo($permission);
Checking Permissions
Check if a user has a permission:
auth()->user()->hasPermissionTo('edit articles');
Check for multiple permissions:
auth()->user()->hasAnyPermission([
    'edit articles', 'publish articles', 'unpublish articles'
]);
In Blade:
@can('edit articles')
    <!-- Your HTML here -->
@endcan
Or:
@if(auth()->user()->can('edit articles') && $someCondition)
    <!-- Some conditional block -->
@endif
Digging Deeper
SetSail uses the Spatie Laravel Permission package under the hood. Explore their docs for more advanced usage and customization.
User Notifications
SetSail leverages Laravel’s default Notification system with a built-in elegant UI to display notifications to your users.
When to Use Notifications
You can use notifications in any scenario where you want to alert users about activity in your app. Common examples include:
- Notifying users in a forum when a new response is added.
- Alerting a user when someone follows them.
- Informing a user when they receive a message.
Creating Notifications
SetSail builds upon the Laravel Notification system. To create a new notification, run the following command:
php artisan make:notification TestNotificationThis will create a file at app/Notifications/TestNotification.php.
By default, the via() method will look like this:
public function via($notifiable)
{
    return ['mail'];
}
Update it to use the database channel:
public function via($notifiable)
{
    return ['database'];
}
Then update the toArray() method to define the content of the notification:
public function toArray($notifiable)
{
    return [
    'icon' => '/storage/users/default.png',
    'body' => 'This is an example, when the user clicks this notification it will go to the link.',
    'link' => '/dashboard',
    'user' => [
        'name' => 'John Doe'
        ]
    ];
}
Customize these fields as needed, and ensure any changes match the variables referenced in the pages/notifications/index.blade.php view file.
Triggering Notifications
You can manually trigger notifications using Tinker:
php artisan tinkerApp\Models\User::find(1)->notify(new App\Notifications\TestNotification);Change find(1) to the appropriate user ID.
Viewing Notifications
Authenticated users can visit the /notifications route to view their notifications.
- Notifications will appear in a list format.
- If there are no notifications, a clean empty state will be displayed.
💡 You can fully customize the view by modifying the file inside your theme: pages/notifications/index.blade.php.
Getting Notification Count
To get the unread notification count for the current user:
auth()->user()->unreadNotifications->count()Digging Deeper
To explore more advanced features, visit the official Laravel Notifications documentation:
Laravel Notifications DocsPages
SetSail makes it easy to create and manage static content pages such as Terms of Service, Privacy Policy, or About Us directly from the admin panel.
Note: This section refers to content pages created from the admin panel. These are different from dynamic theme pages (Volt pages) located in your resources/views/themes/theme-name/pages folder. Volt pages support more customization and logic.
Creating Pages
To create a new static page:
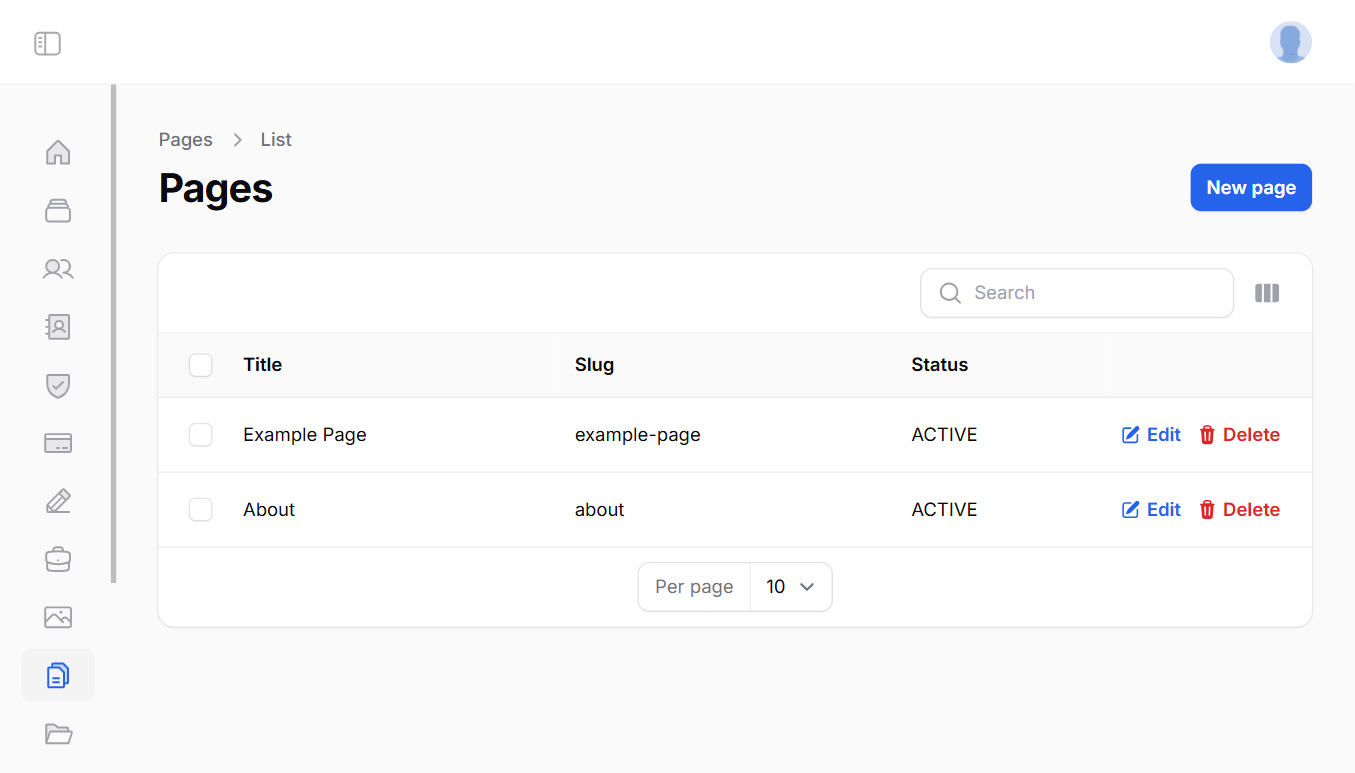
- Visit
/admin/pagesin your browser. - You’ll see a list of example pages (like Terms or Privacy).
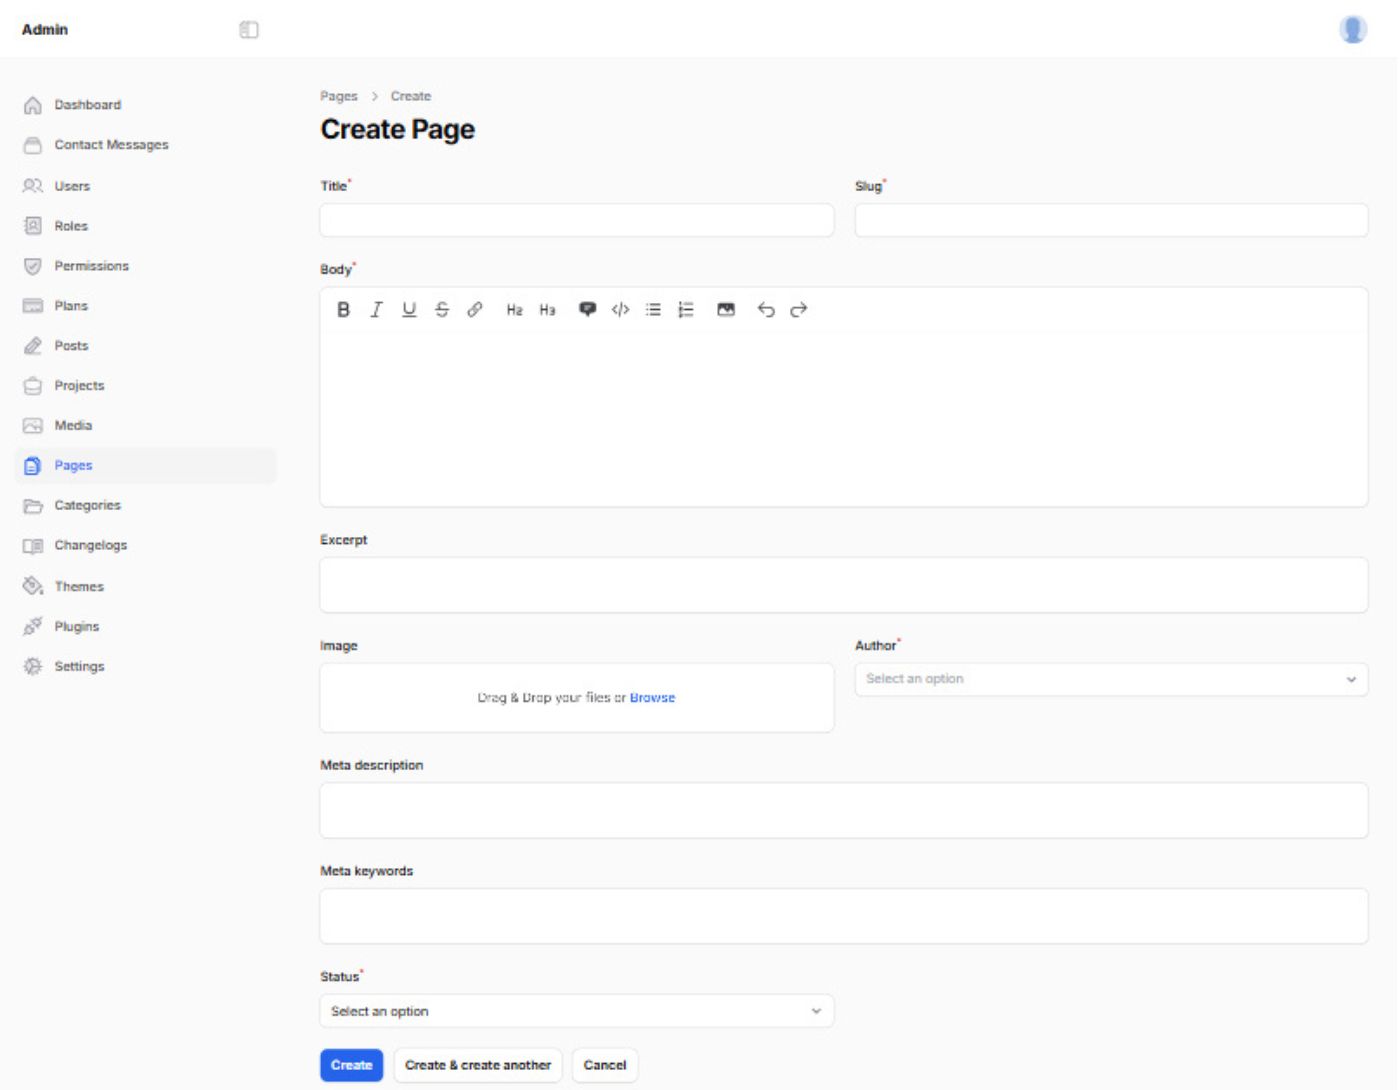
- Click on the New Page button.
- Fill in the form with the title, slug, and content.
After saving, the page becomes accessible using the slug. For example, if the slug is hello-world, the URL will be:
https://yourdomain.com/hello-worldPage View
Pages created through the admin use a default Blade view. You can customize this view at:
resources/themes/your-theme/page.blade.phpThis is where the static page content is rendered. You can customize styling and structure to match your design.
Which to Use?
Here’s how to decide between using admin-created pages and theme-based pages:
| Pages via Admin | Pages via Theme Directory |
|---|---|
| Best for static content like Terms, Privacy, About | Best for dynamic content with custom logic or components |
| Easy to edit directly from the admin panel | Provides more control over layout, logic, and routing |
| Changes take effect immediately | Requires code access and deployment |
Use admin pages for simplicity. Use theme pages when you need advanced customization.
API
SetSail includes a powerful out-of-the-box API, allowing you to expose endpoints for third-party integrations or power your mobile app with ease.
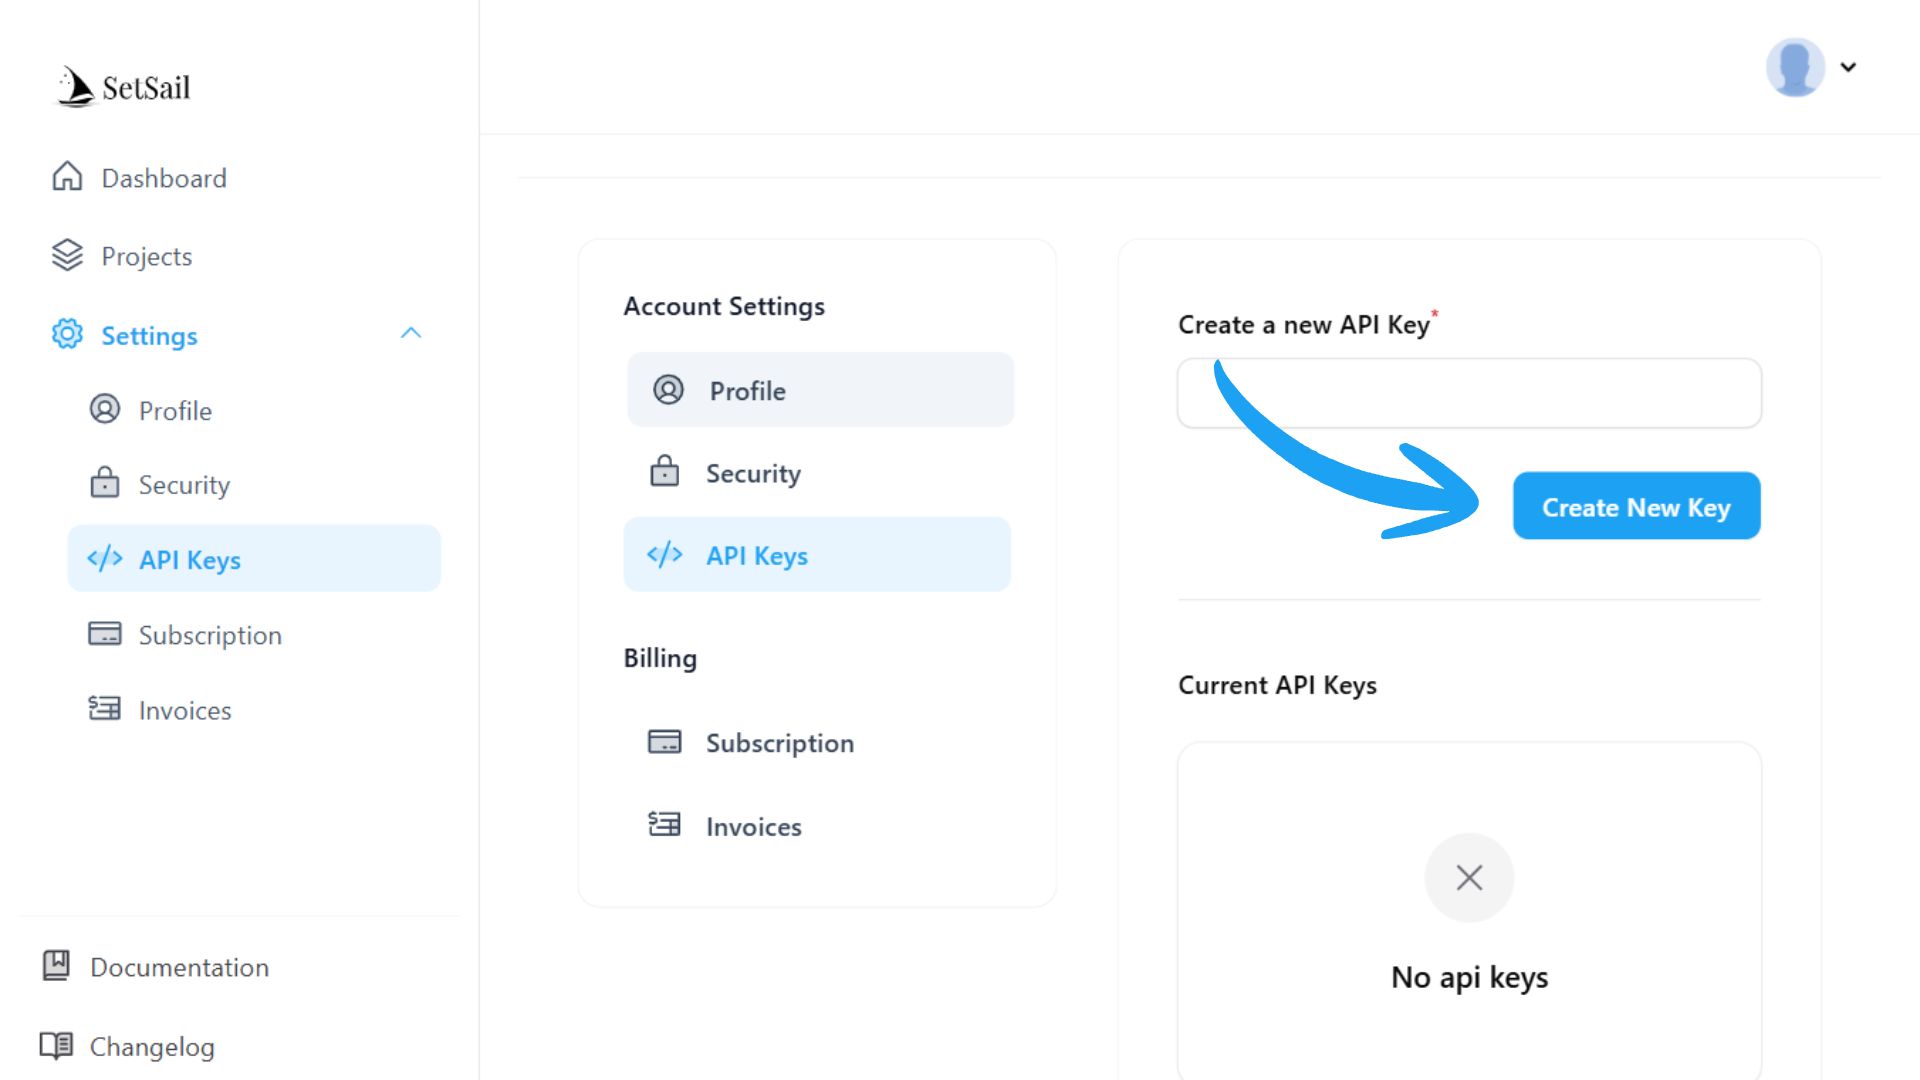
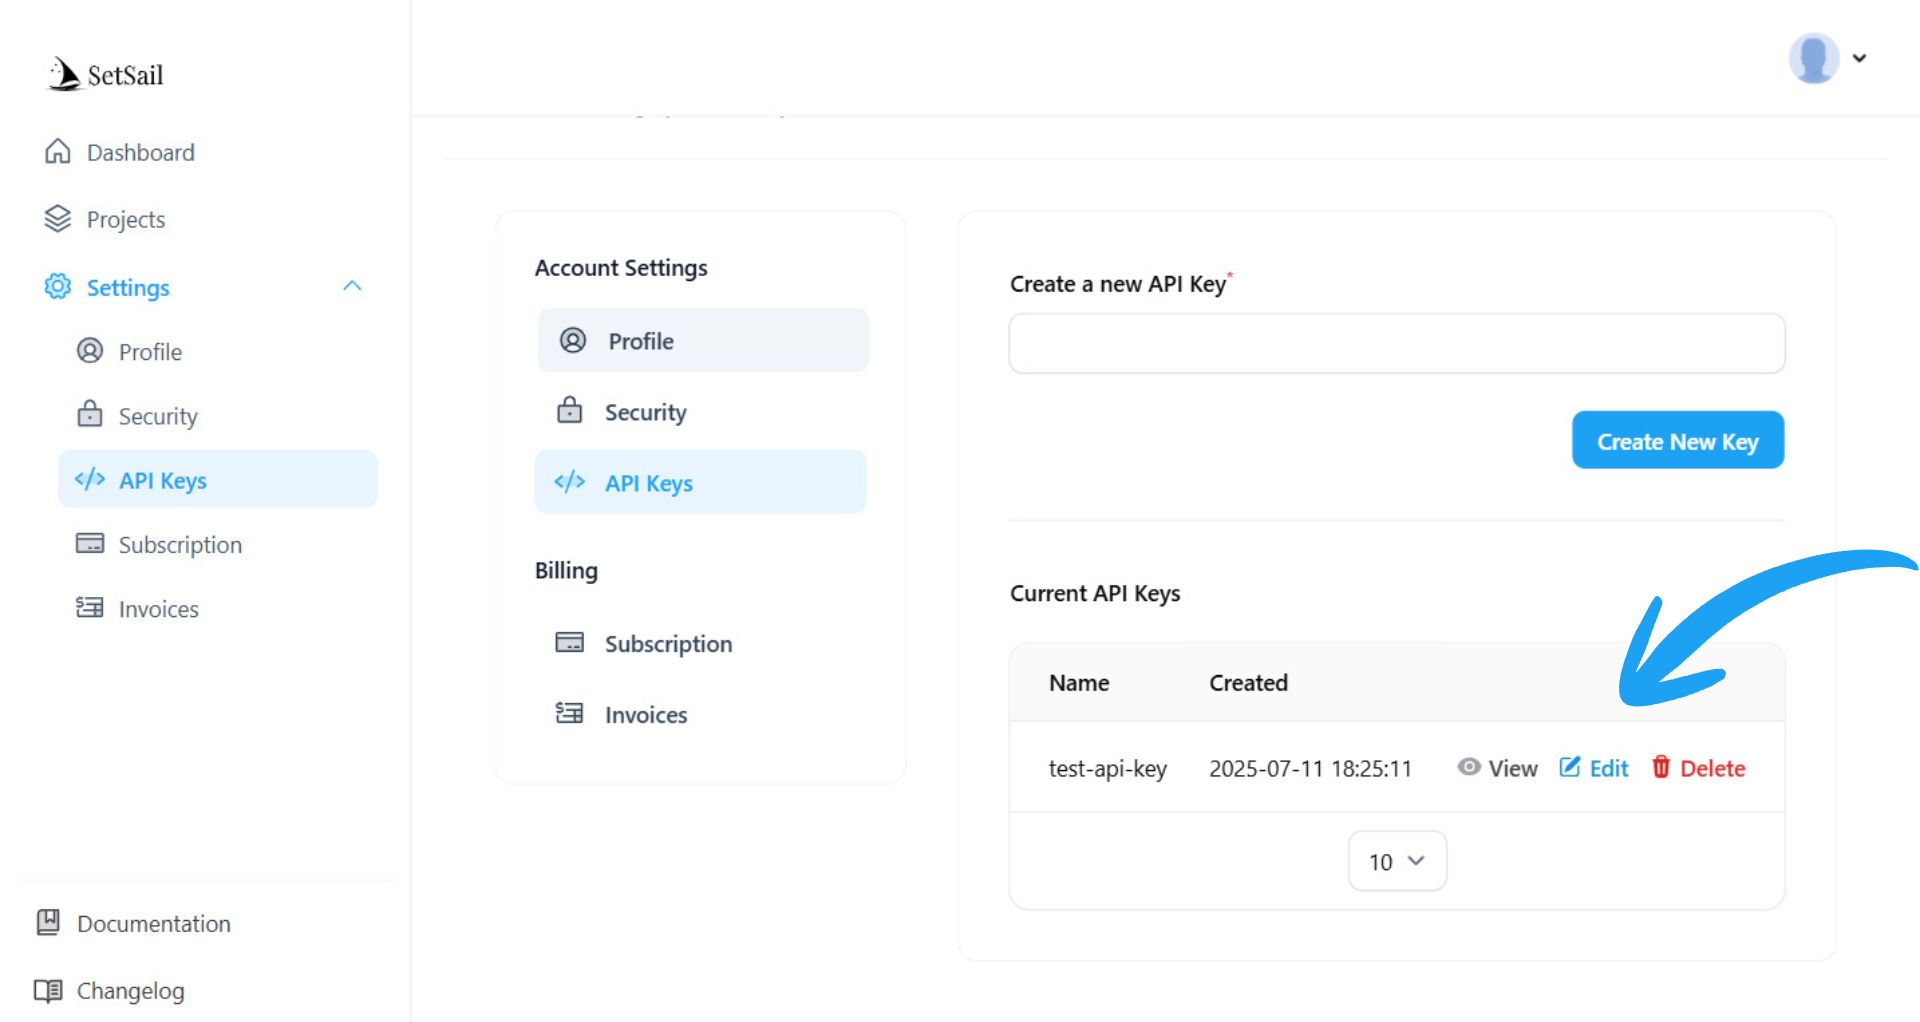
User API Keys
Users can generate API keys by visiting /settings/api.
- Enter a name and click Create New Key.
- View, copy, edit, or delete any generated key.
Access Tokens
To interact with the API, you'll need an Access Token. You can obtain this token using either:
- A user API key
- Email/password login
Get Access Token from API Key
POST /api/token?key=API_KEY_HEREResponse:
{
"access_token": "your.jwt.access.token"
}
Get Access Token from Login
POST /api/login?email=user@example.com&password=your_passwordResponse:
{
"access_token": "your.jwt.access.token",
"token_type": "bearer",
"expires_in": 60
            }
Refresh Token
To refresh an expired token:
POST /api/refreshInclude the old token in the Authorization: Bearer header.
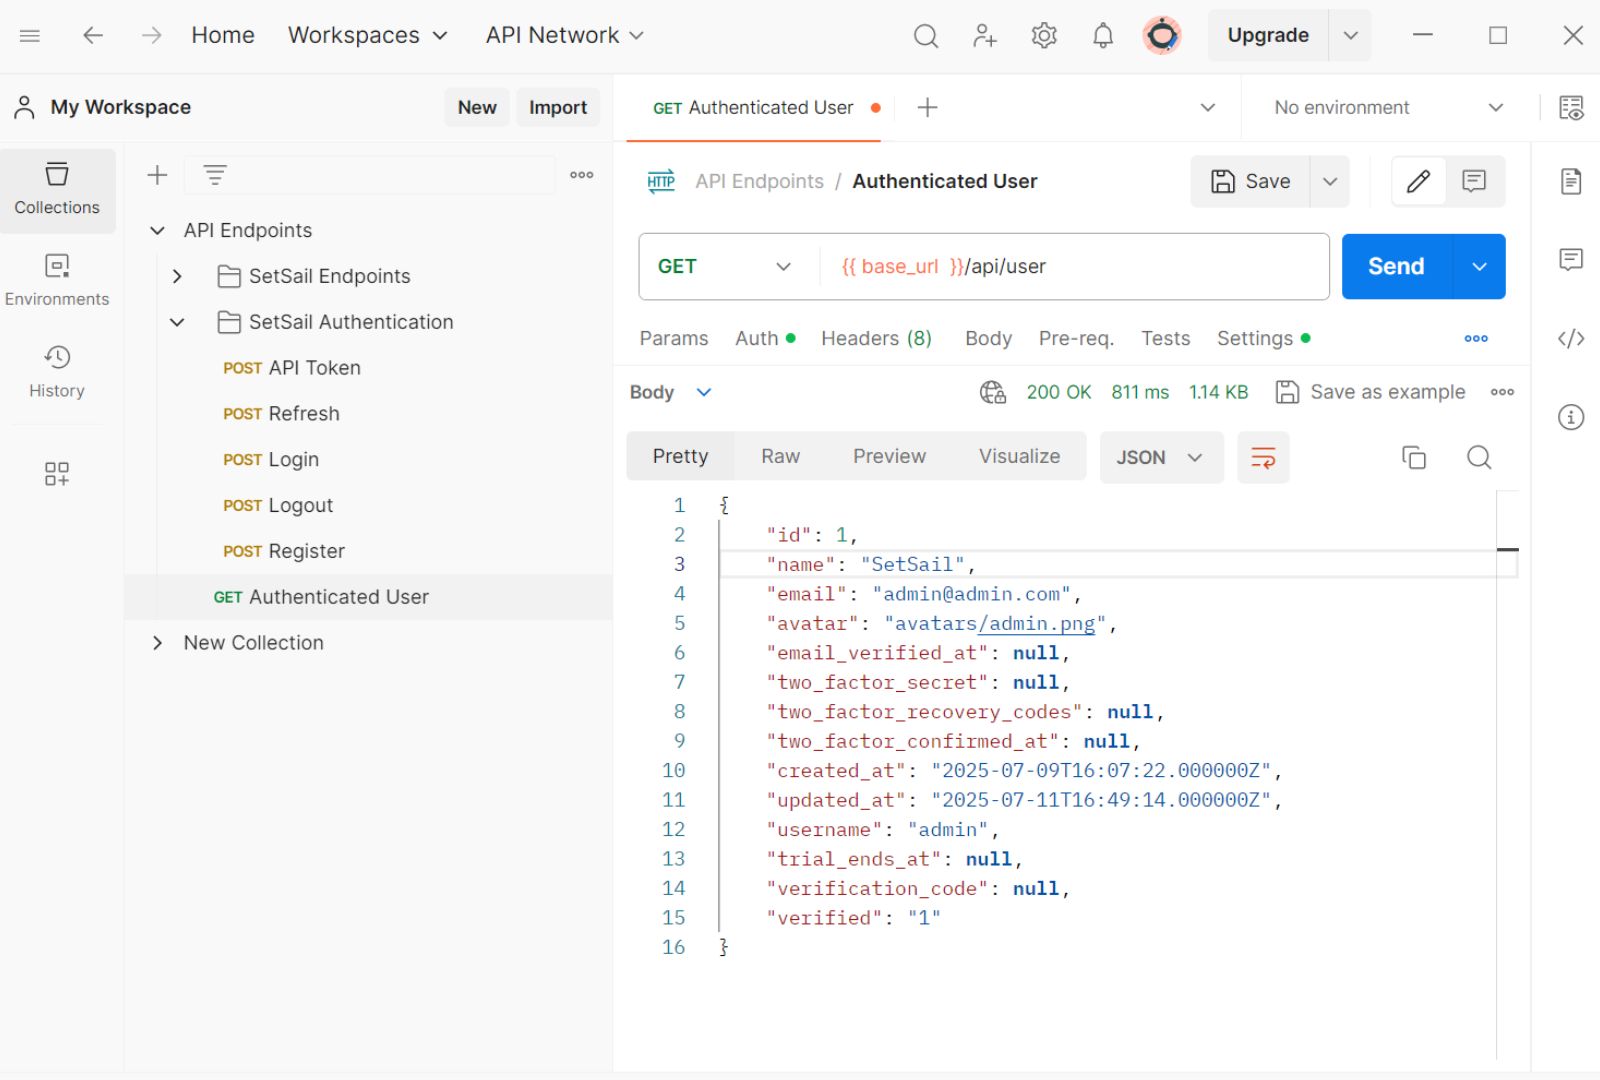
Making Authenticated Requests
Once you have an access token, you can include it in the headers of your API requests:
Authorization: Bearer your.jwt.access.tokenValidate roles/permissions inside routes as needed, or leverage an API management package like:
- Laravel Orion
- Restify
- Laravel API Toolkit
- Filament API Service
Testing Your API
Use tools like Postman or Insomnia to test API endpoints.
Download a full list of available endpoints here:
Be sure to update the BASE_URL to match your local or live domain.
Registering via API
You can register users by sending a POST request:
/api/register?name=John Doe&username=jdoe&email=user@example.com&password=your_passwordThis will automatically return a valid access token.
JWT vs Sanctum
SetSail uses a JWT stateless API by default, which validates each request independently. Laravel Sanctum can be added if needed for stateful (session-based) authentication.
You can even use both JWT and Sanctum side-by-side depending on your app's needs.
Admin
The SetSail admin panel is built using FilamentPHP, providing an elegant, powerful, and customizable interface to manage your application.
Admin Interface
Access the admin panel at /admin. You can collapse or expand the sidebar for a cleaner view.
The admin dashboard allows you to manage:
- Users
- Roles & Permissions
- Plans
- Posts & Categories
- Media Manager
- Pages
- Changelogs
- Themes
- Settings
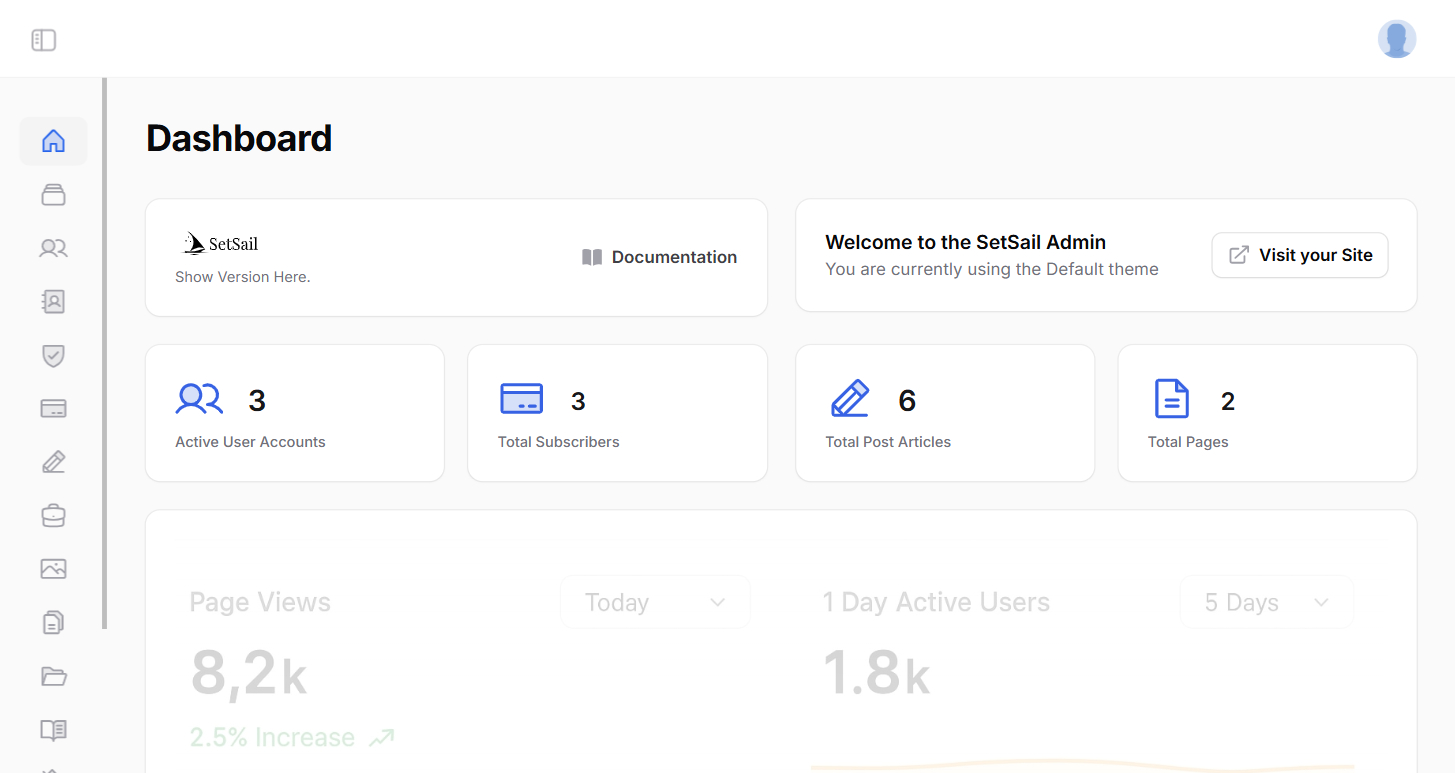
Dashboard Analytics
We use the Filament Google Analytics Plugin (powered by Spatie) to display real-time metrics.
- Add your property ID to
.env:ANALYTICS_PROPERTY_ID=XXXXXXXXX - Download your service account JSON credentials from the Google Cloud Console.
- Save it at
storage/app/analytics/service-account-credentials.json - Refer to Spatie Laravel Analytics Docs for detailed setup.
Filament Admin Features
Filament provides a modern interface and rich tools for backend development. You can extend any part of the panel with Filament’s flexible architecture.
Explore more at Filament Documentation.
Filament Customer Panel
To build a user-facing dashboard, you can:
- Use Filament’s Panel Builder
- Or build a custom view in your theme at
resources/themes/{theme}/dashboard/index.blade.php
We recommend the custom dashboard approach for better UX and design flexibility.
Filament Table Builder
Table Builder lets you create interactive and filterable tables. Example from the API Keys page:
public function table(Table $table): Table
{
    return $table->query(App\Models\ApiKey::query()->where('user_id', auth()->id()))
    ->columns([
        TextColumn::make('name'),
        TextColumn::make('created_at')->label('Created'),
        ])
        ->actions([
            ViewAction::make()->slideOver()->modalWidth('md')->form([
            TextInput::make('name'),
            TextInput::make('key')
            ]),
            EditAction::make()->slideOver()->modalWidth('md')->form([
            TextInput::make('name')->required()->maxLength(255),
            ]),
            DeleteAction::make(),
        ]);
}
Render it with:
{{ $this->table }}Filament Form Builder
To create frontend forms in your theme, you can use Filament’s form builder. Example:
public function form(Form $form): Form
{
    return $form->schema([
        TextInput::make('key')
        ->label('Create a new API Key')
        ->required()
    ])->statePath('data');
}
Render it with:
{{ $this->form }}Learn More
To discover more features of FilamentPHP:
Concepts
Blade Directives
SetSail includes several helpful Blade directives that simplify frontend rendering logic, making your templates more expressive and easier to maintain.
@auth/@guest@admin@subscriber/@notsubscriber@subscribed('PlanName')@home@elseusage
Auth and Guest
To check if a user is authenticated:
@auth
    <p>Welcome back, {{ auth()->user()->name }}!</p>
@endauth
To check if a visitor is a guest (not logged in):
@guest
<p>Please log in to continue.</p>
    @endguest
Admin
To check if a user is an admin:
@admin
<p>You are logged in as an admin.</p>
    @endadmin
Subscriber
To check if the user has any active subscription:
@subscriber
<p>Thanks for subscribing!</p>
    @endsubscriber
Not Subscriber
To check if the user is not subscribed to any plan:
@notsubscriber
<p>Upgrade to a plan?</p>
    @endnotsubscriber
Subscribed to a Specific Plan
To check if the user is subscribed to a specific plan (e.g. Pro):
@subscribed('Pro')
<p>You’re subscribed to the Pro plan.</p>
    @endsubscribed
Note: The plan name must match exactly.
Home
To check if the user is currently on the homepage route:
@home
    <p>You are on the homepage.</p>
@endhome
Using @else with Directives
You can chain @else inside most directives:
@subscriber
    <p>You are a subscriber.</p>
@else
    <button>Become a subscriber</button>
@endsubscriber
Perfect for showing alternate content based on conditions.
Global Helpers
SetSail provides several global helper functions to simplify logic and improve flexibility throughout your application.
setting()
Access key/value pairs defined in the admin panel at /admin/settings.
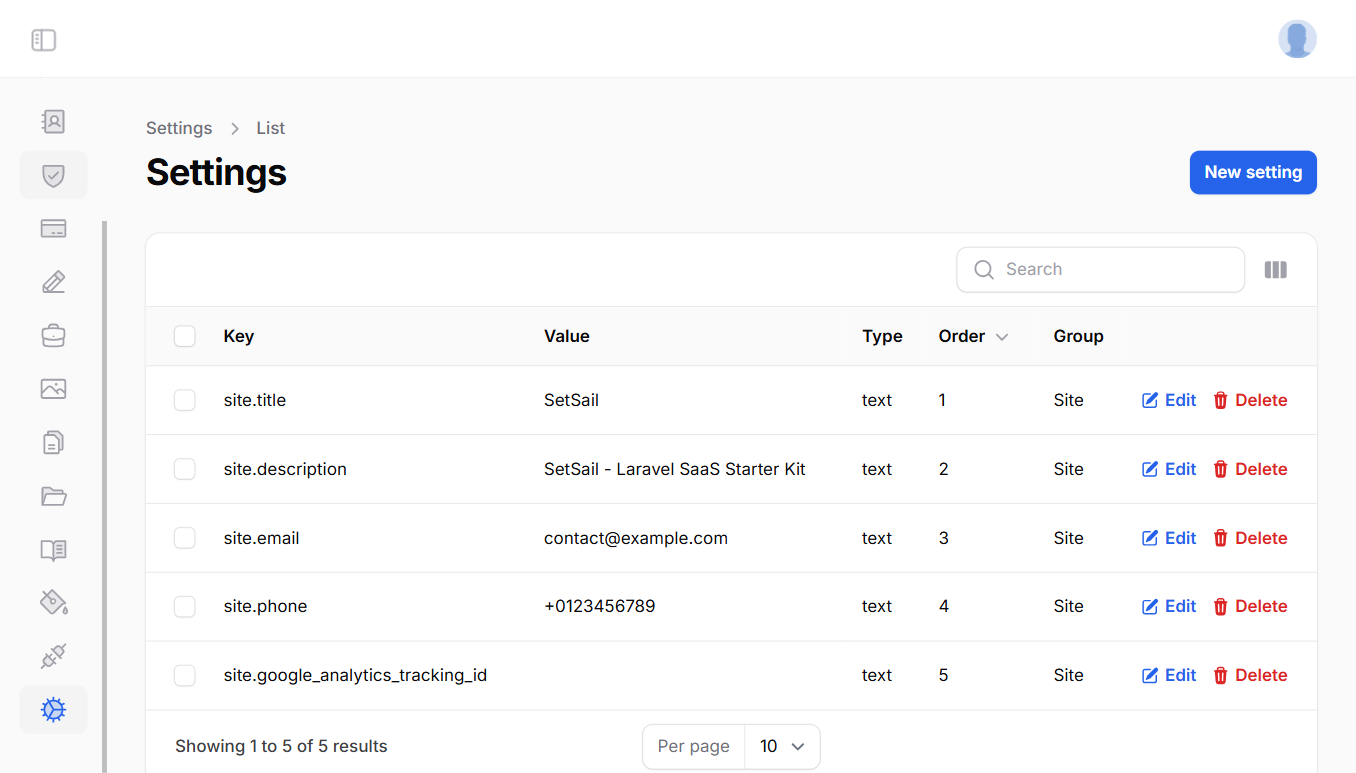
Example usage:
echo setting('site.title');Used in a Blade view for fallback SEO values:
<!-- resources/themes/{theme}/partials/head.blade.php -->
@if(isset($seo->title))
    <title>{{ $seo->title }}</title>
@else
    <title>{{ setting('site.title', 'Laravel SetSail') . ' - ' . setting('site.description', 'The SaaS Starter Kit') }}</title>
@endif
Example for embedding Google Analytics using a saved tracking ID:
<!-- resources/views/themes/{theme}/partials/footer_scripts.blade.php -->
@if(setting('site.google_analytics_tracking_id', ''))
    <script async src="https://www.googletagmanager.com/gtag/js?id={{ setting('site.google_analytics_tracking_id') }}"></script>
    <script>
    window.dataLayer = window.dataLayer || [];
    function gtag(){dataLayer.push(arguments);}
    gtag('js', new Date());
    gtag('config', '{{ setting("site.google_analytics_tracking_id") }}');
    </script>
@endif
Tip: Use prefixes like site. to keep settings organized.
blade()
Parses a Blade string and returns rendered HTML.
@php $name = 'Tony'; @endphp
blade('<p>Hello, my name is {{ $name }}</p>');
Output:
<p>Hello, my name is Tony</p>getMorphAlias($class)
Returns the morph alias for a given Eloquent model class.
getMorphAlias(\App\Models\User::class); // returns 'user'hasmonthlyyearly_toggle()
Returns true or false depending on whether the pricing toggle (monthly/yearly) should be shown.
getdefaultbilling_cycle()
Returns the default billing cycle: either Monthly or Yearly, based on your config.
More helper functions may be added in future releases. You can also contribute your own by submitting a pull request on GitHub.
Volt Pages
When you create or install a new theme, the pages directory inside the theme folder is automatically mapped to routes. This is powered by Laravel Folio and enhanced with Livewire Volt for dynamic functionality.
Pages Directory and Folio
SetSail uses Laravel Folio to handle automatic routing. Here's how your Blade file structure maps to URLs:
| File | Route |
|---|---|
| pages/index.blade.php | / |
| pages/about.blade.php | /about |
| pages/about/index.blade.php | /about |
| pages/blog/index.blade.php | /blog |
| pages/blog/[post].blade.php | /blog/{post} |
| pages/contact.blade.php | /contact |
| pages/services/web.blade.php | /services/web |
| pages/[category]/index.blade.php | /{category} |
| pages/[category]/[id].blade.php | /{category}/{id} |
Learn more in the Laravel Folio Documentation.
Single File Volt Pages
All SetSail themes support Livewire Volt. This means you can turn any page inside resources/themes/{theme}/pages into a dynamic component using Volt’s single-file syntax.
Here’s an example of a basic Todos Volt component:
<?php

            use function Laravel\Folio\{middleware, name};
            use Livewire\Volt\Component;
            use Livewire\Attributes\Rule;
            use Livewire\Attributes\Computed;

            name('todos');

            new class extends Component
            {
                public $todos;

                #[Rule('required')]
                public $todo;

                public function mount()
                {
                    $this->todos = [
                        ['todo' => 'Install SetSail Application', 'completed' => true],
                        ['todo' => 'Read the documentation', 'completed' => false],
                        ['todo' => 'Learn how to use folio and volt', 'completed' => false],
                        ['todo' => 'Add the todos single-file volt component', 'completed' => false],
                        ['todo' => 'See how simple SetSail will make your life', 'completed' => false]
                    ];
                }

                public function add()
                {
                    $this->validate();
                    $this->todos[] = ['todo' => $this->todo, 'completed' => false];
                    $this->reset('todo');
                }

                #[Computed]
                public function remaining()
                {
                    return collect($this->todos)->where('completed', false)->count();
                }
            };
            ?>

            <x-layouts.marketing>
                @volt('todos')
                    <div class="flex items-center justify-center px-16 py-20 bg-neutral-100 text-neutral-300">
                        <div class="bg-white p-10 rounded">
                            <h2 class="text-base font-semibold text-neutral-900">My Todo</h2>
                            <p class="text-sm text-neutral-500">You have {{ $this->remaining }} things on your todo list.</p>

                            <div class="mt-4 space-y-3">
                                @foreach($todos as $todo)
                                    <div class="flex items-start">
                                        <input type="checkbox" wire:model.live="todos.{{ $loop->index }}.completed" class="w-4 h-4 text-indigo-600 rounded">
                                        <label class="ml-3 text-sm font-medium text-neutral-900">{{ $todo['todo'] }}</label>
                                    </div>
                                @endforeach
                            </div>

                            <form wire:submit="add" class="mt-6">
                                <input type="text" wire:model="todo" placeholder="My new todo..." class="block w-full py-1.5 rounded-md ring-1 ring-inset ring-neutral-300">
                            </form>
                        </div>
                    </div>
                @endvolt
            </x-layouts.marketing>
Save this file as resources/themes/anchor/pages/todos.blade.php and visit /todos to view it in action.
Learn more about Volt in the Laravel Volt Documentation.
Prompts
👤 Create a User
The app:create-user command allows you to create a new user and assign them a role through an interactive command-line interface. It uses Laravel's built-in prompt methods and integrates with the Spatie Permission package.
Command Signature
php artisan app:create-userUsage
When you run the command, it will prompt you for the following:
- User's name
- User's email
- User's username
- User's password (input will be hidden)
After validation, it will create the user and prompt you to select a role from available roles.
Step-by-step Process
- Run the command:
php artisan app:create-user - Enter the requested information:
- Name
- Username
- Password (hidden input)
- If validation passes, you’ll be asked to choose a role.
- The selected role is assigned and a success message is displayed.
Validation Rules
- Name: Required, string, max 255 characters
- Email: Required, valid format, unique, max 255 characters
- Username: Required, string, unique, max 255 characters
- Password: Required, must follow default Laravel password rules
Role Assignment
All roles are fetched from the database and displayed for selection. The selected role is assigned using the syncRoles() method, which removes any previously assigned roles before assigning the new one.
Success Output
User created successfully with role: [Selected Role Name]Error Handling
If validation fails, errors are displayed and the command exits with a status code of 1. You’ll need to rerun the command with correct input.
Notes
- The new user is automatically marked as verified (
verified = 1). - This command uses the Spatie Permission package for role management. Ensure it’s properly installed and configured.
syncRoles()removes any existing roles before assigning the new one.- Use with care in production—users created this way are active and verified immediately.
Create a Role
The app:create-role command allows you to create a new role and optionally assign permissions through an interactive CLI prompt. It leverages Laravel's prompt system and integrates with the Spatie Permission package.
Command Signature
php artisan app:create-roleUsage
When you run the command, you’ll be prompted to:
- Enter the role name
- (Optional) Enter a description
- Decide whether to assign permissions
- Select permissions to assign (if applicable)
Step-by-step Process
- Run the command:
php artisan app:create-role - Provide the requested information:
- Role name (required)
- Description (optional)
- If validation passes, the role will be created.
- You will be asked if you want to assign permissions.
- If yes:
- All available permissions will be listed.
- You can select one or more using the prompt interface.
- Permissions will be synced to the new role.
Validation Rules
- Name: Required, string, max 255 characters, must be unique in the roles table
Permission Assignment
If you opt to assign permissions:
- All permissions from the database will be fetched and shown
- You can select multiple permissions
- Permissions are assigned using
syncPermissions(), replacing any previous assignments
Success Output
Role '[Role Name]' created successfully.If permissions were assigned, an additional message appears:
Permissions assigned successfully.Error Handling
- If validation fails, the command displays errors and exits with status code
1. - If no permissions exist during assignment, a warning message is shown.
Notes
- This command relies on the Spatie Permission package—ensure it’s installed and configured.
- The role description is optional but helpful for documentation and management.
- You can always assign or revoke permissions later through the admin panel or code.
- Use this command carefully in production environments, as role creation affects access control.
License
This product is available for purchase on CodeCanyon and is subject to the Envato Market License terms. Upon purchase, you are granted a Regular or Extended License depending on your selection. You may use the product in accordance with the [Envato License Terms](https://codecanyon.net/licenses). Your purchase code may be required for receiving future updates or customer support. Please keep your CodeCanyon purchase code in a safe place.